Welding is one of those crafts that demands both skill and patience. When everything goes right, it’s incredibly satisfying. Even when you think you’ve done everything perfectly, defects still show up in the welding joint. I’ve been there plenty of times, standing over a weld and seeing a crack, a porosity, or some other surprise I didn’t ask for.
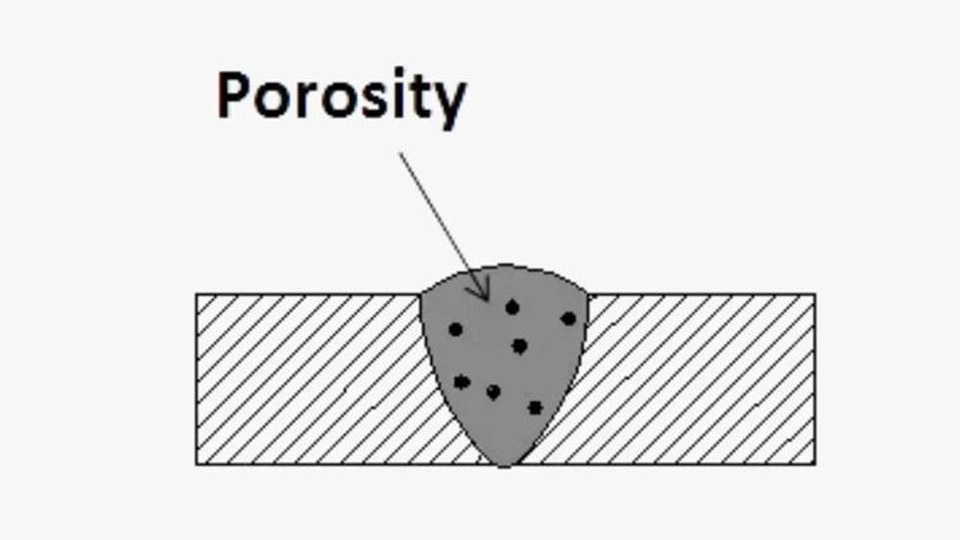
Image by rapiddirect
It’s frustrating. Especially when you’re on a deadline or working on something important. That’s why understanding quick and practical solutions to welding joint defects is so important—not just to fix mistakes, but to avoid them in the future.
I’m going to walk you through the most common welding joint defects I’ve encountered and show you how to quickly deal with them. I’ll also share some handy techniques and real-world fixes that I’ve learned through years of experience.
If you’re welding at home, in a shop, or out in the field, this guide is meant to help you solve problems fast and smart.
What Are Welding Joint Defects and Why Do They Happen?
Welding joint defects are imperfections or irregularities in the weld that can affect its strength, appearance, or functionality. These can happen for many reasons. Sometimes it’s poor preparation.
Other times it’s the wrong technique or a slight mistake in settings. Even environmental conditions like wind or humidity can mess with a weld.
Some defects are visible right away, while others show up during testing or after some time. Regardless, knowing how to spot and fix them quickly can save your project and reduce stress.
Common Types of Welding Joint Defects and Their Quick Fixes
Here’s a closer look at the most common welding joint defects and what you can do about them.
Cracks in the Weld
Cracks are serious. They weaken the weld and can lead to failure under stress. There are different kinds of cracks—hot cracks, cold cracks, and crater cracks.
Quick Solutions:
- Preheat the base metal before welding if it’s a thicker or high-carbon steel. This helps reduce thermal stress.
- Use the right filler metal to match the properties of the base metal.
- Avoid rapid cooling. Let the weld cool slowly to reduce internal stress.
- Reweld the cracked area after grinding out the crack. Don’t just weld over it.
Porosity (Tiny Holes or Bubbles)
Porosity looks like small holes in the weld bead. It’s usually caused by trapped gas from contaminants or improper shielding.
Quick Solutions:
- Clean the base metal thoroughly before welding. Remove rust, oil, paint, and moisture.
- Check your shielding gas flow. Make sure the flow rate is correct and there are no leaks.
- Use dry electrodes or filler rods. Moisture can cause gas pockets.
- Increase arc length slightly if the arc is too short and gas coverage is weak.
Undercut
Undercut happens when the base metal melts away at the edge of the weld, leaving a groove. It reduces the weld’s strength.
Quick Solutions:
- Reduce travel speed. Moving too fast creates undercut.
- Adjust the welding angle. Keep it more perpendicular.
- Use stringer beads instead of wide weaves. This allows better control.
- Decrease welding current. Too much heat can cause the edges to burn away.
Incomplete Fusion
This occurs when the weld metal doesn’t fully fuse with the base metal or previous weld passes. It creates weak spots.
Quick Solutions:
- Increase heat input. Use higher amperage or slower travel speed.
- Clean the joint properly. Rust or scale can prevent fusion.
- Use proper electrode angle and technique to direct heat into the joint.
- Reweld the area after grinding out the poor fusion.
Incomplete Penetration
This means the weld didn’t go all the way through the joint, which weakens the structure.
Quick Solutions:
- Use correct joint preparation. Make sure the groove angle and root opening are suitable.
- Increase current. More heat allows deeper penetration.
- Use the right size electrode or filler. Too large or small can affect penetration.
- Switch to a root pass technique with stringer beads for better control.
Overlap
This is when the weld metal flows over the base metal without fusing to it. It usually looks messy and weak.
Quick Solutions:
- Reduce the welding current. High current causes excessive weld pool fluidity.
- Use correct torch/electrode angle. Keep it at a slight drag angle.
- Slow down a bit. Let the puddle solidify under control.
Slag Inclusion
Slag gets trapped in the weld and prevents proper fusion. This usually happens in stick or flux-cored welding.
Quick Solutions:
- Clean between weld passes. Remove all slag using a chipping hammer and wire brush.
- Use proper technique. Don’t rush the weld. Let the slag float to the top.
- Reweld the area after removing the slag with a grinder.
Burn-Through
Burn-through is when the weld melts completely through the base metal, creating a hole.
Quick Solutions:
- Lower the heat input. Reduce amperage or use a smaller electrode.
- Use a backer plate or copper backing bar if working with thin metal.
- Increase travel speed slightly to avoid concentrating heat in one spot.
Distortion
This is warping of the metal due to heat, especially on long or thin pieces.
Quick Solutions:
- Clamp the workpiece properly. Use jigs or fixtures to keep it in place.
- Use backstep welding technique. It helps balance the heat input.
- Preheat thicker materials to reduce temperature differences.
- Use intermittent welds instead of continuous ones, if possible.
Quick Reference for Common Welding Defects and Fixes
| Welding Defect | Cause | Quick Fix Solution |
|---|---|---|
| Cracks | Rapid cooling, high carbon, wrong filler | Preheat metal, use proper filler, let it cool slowly |
| Porosity | Contamination, moisture, poor gas flow | Clean metal, dry rods, check shielding gas |
| Undercut | High speed, incorrect angle | Slow down, adjust angle, reduce current |
| Incomplete Fusion | Low heat, contamination | Increase heat, clean joint, adjust technique |
| Incomplete Penetration | Low current, improper joint prep | Increase current, prep joint properly |
| Overlap | High current, poor technique | Lower current, control puddle, better angle |
| Slag Inclusion | Poor slag removal between passes | Clean welds, adjust travel angle, use correct technique |
| Burn-Through | Too much heat on thin material | Lower current, use backing bar, move faster |
| Distortion | Uneven heating and cooling | Clamp workpiece, backstep weld, preheat, alternate sides |
How to Prevent Welding Defects Before They Happen
A big part of dealing with welding joint defects is prevention. It saves time, material, and stress. Here are a few tips I always keep in mind.
- Prepare your metal. Clean it like your life depends on it. Even small contaminants can lead to porosity or fusion problems.
- Use the right settings. Know your material, process, and thickness. Set your amperage, voltage, and speed accordingly.
- Pick the right filler. Make sure your rod or wire matches the job.
- Practice consistency. Keep your torch angle, arc length, and travel speed steady.
- Inspect your welds. Look for early signs of problems before moving on to the next step.
- Don’t skip preheat or post-heat if the job calls for it. They make a big difference on tougher materials.
Welding Defects in Different Processes and Their Solutions
Each welding process brings its own challenges. Here’s a look at how to quickly solve common defects in popular welding methods.
Stick Welding (SMAW):
- Watch out for slag inclusion and arc blow. Clean between passes and keep a steady arc.
- Use dry electrodes and proper storage to avoid porosity.
MIG Welding (GMAW):
- Porosity is common if shielding gas coverage is poor. Check nozzle cleanliness and gas settings.
- Spatter can be reduced by fine-tuning voltage and wire feed speed.
TIG Welding (GTAW):
- Incomplete fusion and lack of penetration can be solved by precise heat control.
- Keep your tungsten clean and sharp for best arc stability.
Flux-Cored Welding (FCAW):
- Slag and spatter can be managed with correct polarity and technique.
- Store your wire dry to prevent moisture absorption.
Keep Learning and Stay Patient
Welding is both an art and a science. Even experienced welders run into defects. The key is knowing how to spot them, fix them fast, and most importantly—learn from them. It’s all part of becoming a better welder.
If you’re working in the USA or anywhere else, having this knowledge gives you confidence. You don’t need to panic when something goes wrong. With the right skills and a calm approach, most defects can be fixed quickly without starting from scratch.
Frequently Asked Questions
What causes welding cracks and how can I fix them fast?
Cracks are usually caused by rapid cooling, high-carbon steel, or incorrect filler. To fix them, preheat the base metal, use a matching filler, and weld slowly. Always grind out the crack before rewelding.
How do I prevent porosity in MIG welding?
Clean the base metal, ensure your gas flow is stable, and keep the nozzle free from spatter. Also, avoid welding in windy conditions and store your wire properly.
Can I weld over a defect to fix it?
Not usually. It’s better to grind or gouge out the defect completely and then reweld. Simply welding over a problem can trap it deeper and make things worse.
Why do my welds keep undercutting?
Undercut happens if you’re moving too fast or using too much current. Slow your travel speed, reduce heat, and adjust your torch angle.
Is it okay to use a smaller electrode to fix burn-through?
Yes. Using a smaller electrode with lower current is a smart way to avoid further burn-through. Also consider backing bars for support when working with thin metal.
What’s the best way to remove slag between passes?
Use a chipping hammer followed by a wire brush. Don’t rush it—make sure the surface is clean before your next bead.
Can I fix distortion after welding?
Minor distortion can be corrected by controlled hammering or pressing. But it’s best to prevent it by clamping the work, preheating thick parts, or using intermittent welds.


