When I first started TIG welding, I’ll be honest—it felt intimidating. All the foot pedal control, torch angles, filler rods… it’s a lot to take in. The more time I spent with it, the more I appreciated its beauty and precision.
TIG welding, or Tungsten Inert Gas welding, isn’t just about melting metal together. It’s about skill, finesse, and understanding the materials and tools in your hands.
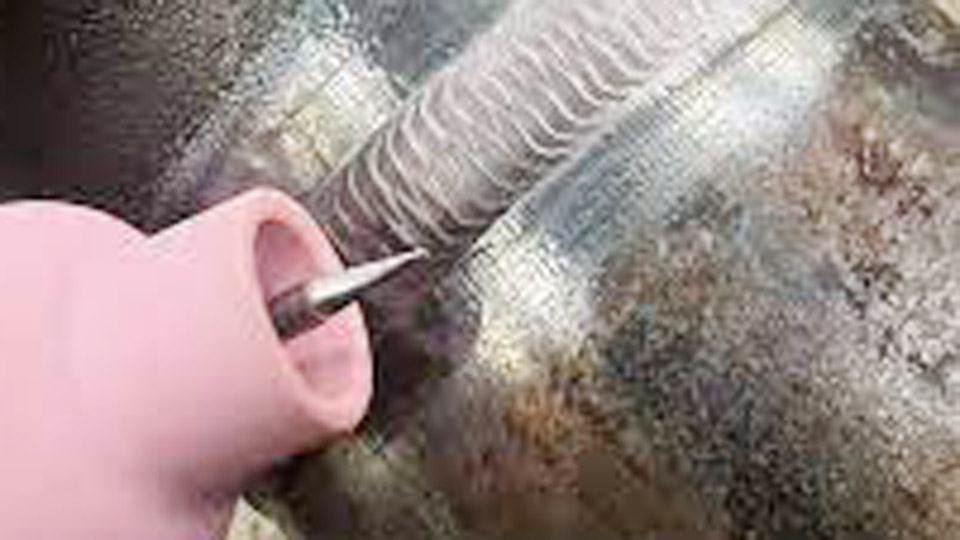
Image by instagram
If you’re in the U.S. and just getting into TIG welding—or even if you’ve been doing it for a while—you’re in the right place.
I’m going to walk you through all the essential tips and tricks I’ve learned from personal experience, mistakes, and many hours under the hood. My goal is to help you weld cleaner, smarter, and safer.
Basics of TIG Welding


Before we dive into the tips and tricks, let’s get a few basics straight. TIG welding uses a non-consumable tungsten electrode to produce the weld. You use a filler rod when needed, and argon gas shields the weld from contamination.
It’s great for welding stainless steel, aluminum, magnesium, and other metals that need precise heat control. TIG is popular in industries like aerospace, automotive, and art sculpture because of how clean and beautiful the welds can look. Let’s go through the good stuff—what you came here for.
Keep Everything Clean
I can’t stress this enough—cleanliness matters in TIG welding more than any other type of welding I’ve done. Even the tiniest bit of oil, rust, or dirt can mess up your weld.
Clean your base metal with a stainless steel wire brush. Make sure it’s not the same brush you use for other metals to avoid contamination.
For aluminum, I often wipe the surface with acetone right before welding. And always keep your filler rods clean too. Dirty rods can bring in all sorts of junk into your weld pool.
Get Comfortable with Your Setup
One of the best things I did early on was to arrange my workspace to be as comfortable as possible. TIG welding requires precision and control, so you don’t want to be stretching, leaning awkwardly, or struggling to see.
Here’s what I recommend:
- Sit if you can. It offers more control than standing.
- Rest your hands. I often use my pinky or the side of my hand to steady the torch.
- Use proper lighting. Even though your helmet has a lens, extra lighting helps you set up the weld before striking an arc.
Master the Art of Torch Angle
The angle of your torch makes a big difference in how your weld turns out. I usually hold my torch at about a 15-degree angle from vertical, pointing in the direction I’m welding. That gives me a clear view of the weld pool and helps the shielding gas flow properly.
Too steep of an angle can let air sneak in. Too flat, and you may block your view or even contaminate the tungsten with filler metal.
Use the Right Tungsten and Grind It Properly
Choosing the right tungsten for your application is crucial. I mostly use 2% lanthanated tungsten—it’s versatile and works well for both AC and DC welding.
Make sure your tungsten is sharpened to a point when doing DC welding (like stainless steel). For AC welding (like aluminum), a rounded or balled tip works better.
Also, grind the tungsten lengthwise, not around the circumference. This helps the arc stay focused and stable.
Foot Pedal Control Is Everything
This one took me the longest to get right. TIG welding is like driving a car with a manual transmission—the foot pedal controls your amperage.
Practice slowly increasing and decreasing the amperage as you move along the weld. Don’t just slam it down or let off too fast. Smooth foot control helps you adjust the heat in real time and prevents overheating or undercutting your weld.
Sometimes I just practice on scrap metal, only using the pedal and torch without even adding filler. It helps you get a feel for how heat behaves.
Don’t Dip the Tungsten
One of the most frustrating things is dipping your tungsten into the weld pool or the filler rod. It contaminates the tip and messes up the arc instantly.
If you do dip it, don’t keep welding. Stop, turn off the machine, remove the tungsten, regrind it, and get back to work. Yes, it takes time—but continuing with contaminated tungsten will only lead to ugly welds.
Learn the Timing of Filler Rod Dipping
This is more about rhythm than anything. The trick is to dip the filler rod into the front edge of the weld pool, not right in the center.
I usually follow this pattern: move the torch slightly forward, pause, dip the rod, move again. It creates that beautiful stacked-dimes look everyone loves.
Also, don’t leave your filler rod in the arc when you’re not dipping—it’ll ball up and oxidize.
Use the Right Shielding Gas and Flow Rate
Argon is the go-to gas for most TIG welding. If you’re working with aluminum or stainless steel, 100% argon is ideal.
Set your flow rate based on your cup size and environmental conditions. Indoors, I generally keep it around 15–20 CFH (cubic feet per hour). Outdoors or if there’s a draft, you might need to bump it up a bit.
Too little gas and your weld gets oxidized. Too much, and it can create turbulence and suck in air.
Choose the Right Cup Size and Gas Lens
I love using a gas lens—it spreads the argon more evenly and gives you better coverage. That means better shielding, especially when you’re working on odd angles or tight spaces.
Cup size depends on what you’re welding. For tight corners, I go with a smaller #5 or #6 cup. For broader coverage, something like a #10 is perfect. Transparent Pyrex cups can also help you see the weld pool more clearly.
Take Your Time on Aluminum
Welding aluminum with TIG is its own challenge. It has high thermal conductivity, so it heats up and cools down fast. You need to be patient and controlled.
I always preheat thicker aluminum with a torch if possible. It helps the weld pool form faster and more evenly. Also, set your machine to AC with proper balance and frequency for aluminum—it’ll help clean the oxide layer and produce a smooth weld.
Practice “Walking the Cup”
This is a technique I love for pipe and round tubing welds. You rest the ceramic cup on the workpiece and move it side to side while feeding the rod. It’s stable and gives you great-looking welds with less effort.
It may take a little getting used to, but once you get the hang of it, you’ll love the control and consistency.
Watch Your Heat Affected Zone (HAZ)
You don’t want the metal to get too hot and lose its structural integrity. If you notice the area around your weld getting too wide and discolored, it’s time to back off the heat or speed up your travel.
Always try to keep your welds narrow and focused. That usually means better strength and less post-cleanup.
Keep a Steady Hand and Relax
The biggest tip I can give you? Stay calm and relaxed. A shaky hand or tense grip can ruin even the best setup.
Take a breath, slow down, and remember that TIG welding isn’t about speed—it’s about control. I sometimes hum to myself while welding just to keep a steady rhythm.
Have a Good TIG Welder and Accessories
A reliable TIG machine makes a world of difference. Look for something that has both AC and DC capability if you plan to weld a variety of metals. Inverter welders are lighter and offer more settings, which is great for precise work.
Good accessories like a quality torch, foot pedal, and gas regulator make welding smoother and safer. Cheap gear might save you money now, but it’ll cost you in the long run with poor performance and repairs.
Keep Track of Your Settings
When you find a setup that works well for a certain job, write it down. Trust me—there’s nothing worse than trying to remember your exact amperage or pulse settings later.
You can keep a welding notebook or even use your phone to snap a picture of the settings. It’s a simple habit that saves you so much time.
Recommended Settings for Common TIG Welds
Here’s a quick guide I like to use when setting up TIG welds for different metals:
| Metal Type | Polarity | Amperage (1/16″ thick) | Tungsten Type | Shielding Gas | Cup Size |
|---|---|---|---|---|---|
| Steel (mild) | DCEN | 60–90 A | 2% Lanthanated | 100% Argon | #6–#8 |
| Stainless Steel | DCEN | 70–100 A | 2% Thoriated/Lanth | 100% Argon | #6–#10 |
| Aluminum | AC | 80–130 A | Pure or Lanthanated | 100% Argon | #7–#10 |
| Titanium | DCEN | 50–80 A | 2% Lanthanated | 100% Argon | #10+ gas lens |
Always adjust based on thickness and joint type. Practice is the best teacher.
Safety First, Always
Never skip safety. Wear proper gloves, a quality helmet with an auto-darkening lens, and flame-resistant clothing. TIG doesn’t spatter much, but UV rays and hot metal are still dangerous.
Keep a fire extinguisher nearby and always weld in a ventilated space. The shielding gas can displace oxygen, so don’t weld in enclosed areas without ventilation.
Conclusion
TIG welding is truly an art form. It takes patience, practice, and attention to detail. Once you get the hang of it, the results are absolutely worth it. Clean, strong, and visually beautiful welds are what set TIG apart.
If you’re just starting out or trying to improve your technique, these tips and tricks should help you feel more confident every time you strike an arc. Don’t get discouraged if it doesn’t click right away—keep practicing, keep learning, and enjoy the process.
Frequently Asked Questions
What is the best tungsten for TIG welding?
For general use, 2% lanthanated tungsten is great. It works for both AC and DC welding and provides a stable arc.
Why does my tungsten keep getting contaminated?
It usually happens when you dip it into the weld pool or touch the filler rod. Be mindful of angles and keep a steady hand.
Can I TIG weld without a foot pedal?
Yes, but a foot pedal gives you better control over heat. Some machines also offer fingertip controls if a pedal isn’t convenient.
What gas do I need for TIG welding aluminum?
You’ll want 100% argon gas. Make sure your machine is set to AC for aluminum.
How can I make my TIG welds look better?
Focus on consistency. Use proper filler rod technique, maintain a clean arc, and control your travel speed and heat.