Welding aluminum is something I’ve always enjoyed—challenging but deeply rewarding. When I first got into TIG welding aluminum, I quickly realized it wasn’t like welding steel or stainless. It needed more finesse, more patience, and a better understanding of how the metal reacts to heat.
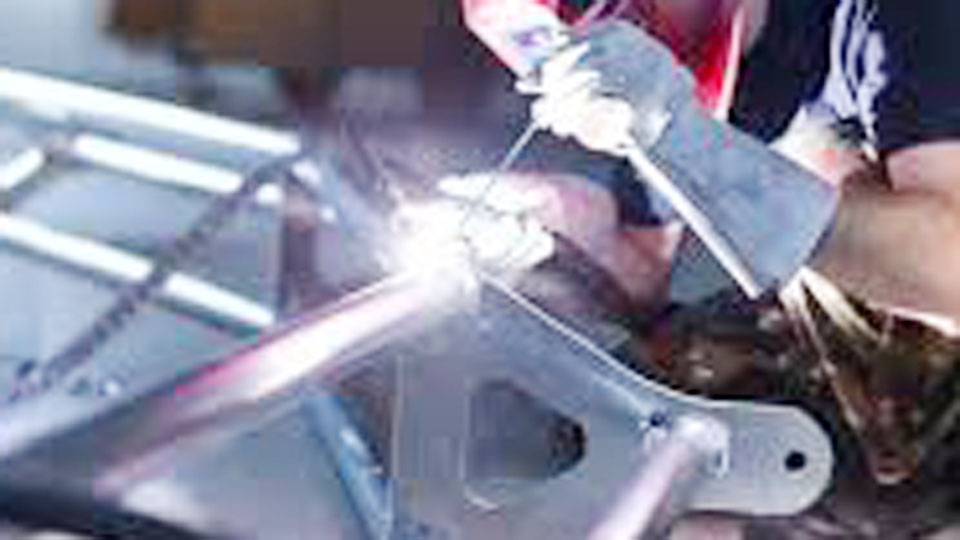
Image by westermans
If you’re just stepping into TIG welding aluminum or looking to get better at it, you’re in the right place. I’ve spent years in the shop, under the hood, perfecting my technique, and I’d love to share everything I’ve learned with you.
Let’s walk through the techniques that can really help you master TIG welding aluminum. If you’re welding car parts, building a bike frame, or working on a project in your garage, these insights will help you get strong, clean, and professional-looking welds.
Why Aluminum Is Tricky to Weld


Before we get into the techniques, let’s talk about aluminum itself. Unlike steel, aluminum has a lower melting point and a much higher thermal conductivity.
That means it heats up fast and distributes heat quickly across the material. At the same time, it doesn’t change color much before it melts, so it’s easy to burn through if you’re not careful.
Aluminum also forms an oxide layer on its surface that melts at a much higher temperature than the metal underneath. If that layer isn’t cleaned properly, your weld won’t fuse well. That’s why proper prep is half the battle.
Getting Your Work Area Ready
A clean work area is critical when working with aluminum. Any dirt, oil, or oxidation can affect your weld. I always make sure my bench is free of clutter and that I have good lighting.
Aluminum reflects light a lot, so I keep my helmet lens cleaned and sometimes even use an extra light source near the weld zone.
Make sure to ground your workpiece properly. A poor ground connection can lead to arc instability and inconsistent welds. I like to clamp directly onto the piece when I can or to a clean, unpainted part of the table that touches it securely.
Choosing the Right TIG Welder Settings
When it comes to aluminum, using AC (alternating current) is essential. This allows for a cleaning action that breaks up the oxide layer while still penetrating the base metal. Here’s how I typically set my machine:
| Parameter | Suggested Setting for Aluminum |
|---|---|
| Current Type | AC |
| Balance Control | 65–75% Electrode Negative |
| Frequency | 100–150 Hz (for better arc focus) |
| Amperage | 1 Amp per 0.001″ of material thickness |
| Gas Flow Rate | 15–20 CFH (Cubic Feet per Hour) |
| Tungsten Type | 2% Lanthanated or Pure Tungsten |
| Shielding Gas | 100% Argon |
Of course, these settings might change a bit based on the job. Thinner materials need lower amperage, and if you’re doing outside corners, you might even dial the balance closer to 60% EN for more cleaning.
Selecting the Right Tungsten
For aluminum, I typically use either pure tungsten (green) or 2% lanthanated (blue or gold tip). Lanthanated tungstens last longer, hold a better arc, and work well when you’re pushing higher amps. I usually sharpen it to a balled tip for AC welding, but I let the arc form the ball naturally rather than grinding it.
Keep your tungsten clean. If you accidentally touch the filler rod or puddle, stop and clean or cut the tip. Contamination leads to arc wander and messy welds.
Cleaning the Base Metal
This is probably the most overlooked step. If you don’t clean aluminum properly, the oxide layer will mess with your arc and ruin the weld.
Here’s my cleaning routine:
- Degrease with Acetone – Wipe down the entire weld area with a lint-free cloth soaked in acetone. This removes oil, fingerprints, and grime.
- Use a Stainless Steel Wire Brush – Brush in one direction only and never use that brush for anything but aluminum.
- Avoid Touching After Cleaning – Oils from your skin can re-contaminate the surface.
Even small specks can lead to porosity or weak welds, so clean like your weld depends on it—because it does.
Holding the Torch Correctly
TIG welding is all about control. Your torch angle should be around 10 to 15 degrees from vertical, pointed in the direction you’re welding. Keep your tungsten about 1/8 inch off the surface. Too close, and you’ll contaminate it. Too far, and your arc won’t be focused.
Rest your hand on the table or use a pinky finger brace to steady the torch. I can’t stress this enough—control is everything in TIG welding. Shaky hands lead to uneven welds, inconsistent arc length, and missed puddles.
Mastering the Puddle
One of the first challenges I faced was recognizing the aluminum puddle. Unlike steel, aluminum doesn’t glow red before it melts. You’ll see it go from a shiny surface to a glossy, reflective liquid pool. That’s your puddle.
The moment you see that pool form, that’s when you feed your filler rod. Dip it in at the leading edge of the puddle, not the center, and then pull it out cleanly. Don’t let it sit in the arc too long or it’ll ball up or burn back.
Feeding the Filler Rod Smoothly
Aluminum filler rod melts fast. You have to be ready and feed consistently. I use a push technique and feed the rod into the leading edge of the puddle. Never pull the rod toward you, as that just brings contamination into the weld.
I also like to preheat the rod slightly by letting it near the arc before dipping. It prevents a cold start and helps the rod flow better. Just don’t let it touch the tungsten.
Controlling Heat and Amperage
Aluminum builds heat quickly. On longer welds, you’ll notice the puddle growing wider as you go. This is called heat soak. You might need to reduce amperage gradually as you move along or pulse your foot pedal to maintain a consistent puddle.
Using a foot pedal is a game-changer. It gives you instant control over your heat. If you’re starting to feel the metal sink or puddle expand too fast, just ease off a little. You’ll feel it more than see it at times.
Using Pulse Settings (Optional)
Some TIG welders have a pulse function, and it’s especially helpful for aluminum. Pulsing alternates between high and low amperage rapidly, allowing the weld to cool slightly between pulses. This helps with heat control and gives the weld a stacked-dime appearance.
I use settings like:
- Pulse Frequency: 1–2 Hz for hand rhythm
- Peak Current: 100%
- Background Current: 30–50%
- Duty Cycle: 30–50%
It takes some trial and error, but when dialed in right, it gives you that professional look with less distortion.
Tack Welding for Better Control
Aluminum likes to warp. I always tack weld my parts generously before doing the full run. I space tacks about every 1 to 2 inches depending on the length of the joint. Tacking holds everything in place and prevents movement during welding.
If you’re welding a butt joint or lap joint, tacks keep your gaps consistent and give you visual markers as you move.
Common Mistakes to Avoid
Here are a few lessons I learned the hard way:
- Skipping cleaning: Even a speck of oil or dirt can ruin the weld.
- Too much heat: Burn-through is easy with aluminum. Control your amps.
- Incorrect filler rod: Always use ER4043 or ER5356 for most aluminum jobs.
- Wrong shielding gas: Always use 100% argon. No mixes.
- Poor torch angle: Keep it steady and consistent.
Recommended Filler Rods for Aluminum
Different types of aluminum alloys work better with specific filler rods. Here’s a basic table I keep in my notebook:
| Base Metal Alloy | Recommended Filler Rod |
|---|---|
| 6061, 6063 | ER4043 or ER5356 |
| 5052 | ER5356 |
| Cast Aluminum | ER4047 |
| 3003 | ER4045 or ER1100 |
Check the material if possible before welding. Not all aluminum is created equal, and some are more weldable than others.
Practicing Makes Perfect
I know it sounds obvious, but practice is everything with TIG welding aluminum. Don’t jump right into a big project. Get some scrap aluminum and practice running beads, starting and stopping arcs, and feeding filler rod cleanly.
Every time you weld, you build muscle memory. Eventually, it becomes second nature.
Conclusion
TIG welding aluminum can feel frustrating at first, but once you get the hang of it, it’s one of the cleanest and most satisfying welding processes out there.
I remember the first time I laid down a clean aluminum bead—it looked like stacked dimes, and I couldn’t stop grinning.
With the right prep, the right technique, and a little patience, you can get there too. Always take your time, watch your heat, keep things clean, and stay consistent. Don’t rush it. Mastery takes time.
Welding aluminum is a craft, and like any craft, the beauty is in the details.
Frequently Asked Questions
What tungsten is best for TIG welding aluminum?
I recommend 2% lanthanated or pure tungsten. Lanthanated offers better arc stability, while pure tungsten gives a smooth ball for AC welding.
Do I need AC or DC for TIG welding aluminum?
You need AC (alternating current) because it provides a cleaning action that breaks up aluminum oxide while allowing the arc to penetrate.
Why does my aluminum weld look dirty or black?
That usually means contamination—either from a dirty base metal, improper gas coverage, or a contaminated filler rod.
What’s the best shielding gas for aluminum TIG welding?
Always use 100% argon. Mixed gases like argon/CO₂ are not suitable for TIG welding aluminum.
Can I use a foot pedal for TIG welding aluminum?
Yes, and you should. It gives you real-time control over heat input, which is essential when welding a material like aluminum.
How do I avoid warping when welding aluminum?
Use tack welds, manage your heat with a foot pedal or pulse settings, and don’t overweld. Let it cool if needed.