Welding gray cast iron can seem intimidating at first, especially if you’ve never worked with it before. I remember the first time I had to weld a cracked gray cast iron machine part. I wasn’t sure which method to use or how to stop the metal from cracking even more.
After trial, error, and a lot of learning, I can now say welding gray cast iron is totally doable—with the right technique and patience.
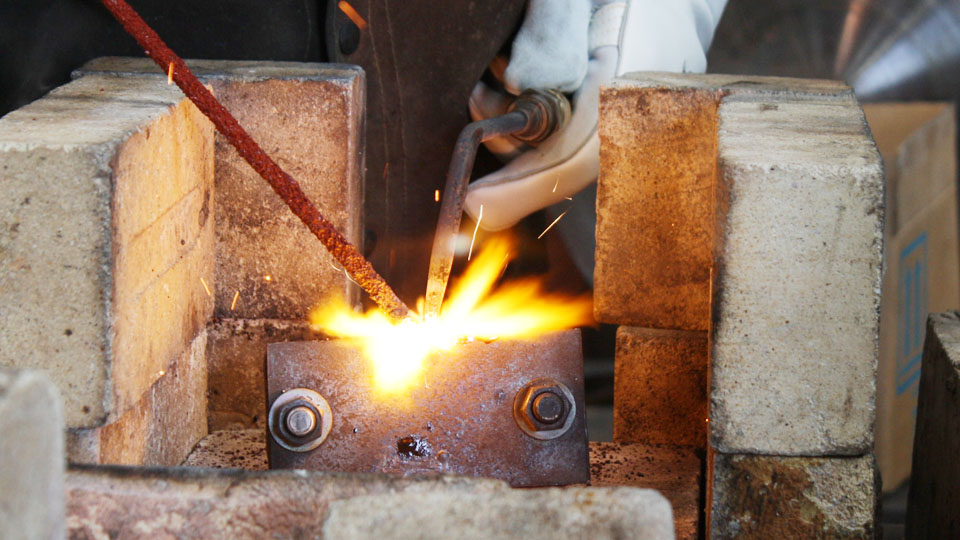
Photos by metallurgyfordummies
If you’re here wondering how to weld gray cast iron the right way, If you’ve got a cracked exhaust manifold, a broken engine block, or even an old cast iron fixture, I’ve got your back.
This guide is everything I’ve learned from hands-on experience, all written in a way that’s easy to follow. So let’s dive into the details together.
Understanding the Gray Cast Iron


Before jumping into the welding part, it helps to know what we’re working with. Gray cast iron is one of the most commonly used types of cast iron. You can recognize it by its gray fracture surface due to the presence of graphite flakes.
These flakes give gray cast iron its excellent vibration damping and machinability. But they also make it more brittle and prone to cracking when you apply heat.
Unlike steel, which can flex and stretch a little under pressure, gray cast iron can crack without warning if it’s not treated with care. That’s why welding it requires a different approach than what you might be used to with steel or stainless steel.
When Should You Weld Gray Cast Iron
In my experience, not all gray cast iron parts should be welded. Sometimes, it’s safer and cheaper to replace the part entirely.
There are situations where welding is necessary or the only option, especially with vintage or one-of-a-kind pieces.
Common situations where welding gray cast iron makes sense:
- Cracked engine blocks
- Broken exhaust manifolds
- Damaged cast iron furniture
- Cast iron pump housings
- Heavy machinery parts
But keep this in mind—welding gray cast iron is more of a repair job than fabrication. You’re not building something new. You’re fixing something that was once whole.
Challenges of Welding Gray Cast Iron
Here’s the real talk: gray cast iron isn’t easy to weld. If you don’t follow the right process, you’ll probably end up with more cracks than when you started. Some key challenges I’ve faced include:
Cracking from thermal stress: Gray cast iron expands and contracts unevenly when heated. If you heat it too fast or cool it too quickly, it can crack right along the heat-affected zone.
Porosity: The graphite structure can lead to small pores in the weld area, especially if there’s contamination like oil or rust.
Lack of ductility: Gray cast iron doesn’t bend; it breaks. That’s why preheating and slow cooling are so important.
Types of Welding Processes for Gray Cast Iron
Over the years, I’ve tried different methods to weld gray cast iron. Some work better than others depending on the job. Here are the most common welding processes you can use.
Stick Welding (SMAW)
This is the most popular and widely used process for welding gray cast iron. Stick welding uses a flux-coated electrode that melts into the weld joint.
What makes stick welding so good for cast iron is the use of nickel-based electrodes. Nickel has a similar expansion rate to cast iron, so it minimizes cracking.
Two common electrodes I recommend:
- ENi-CI (Nickel-99): For high machinability
- ENiFe-CI (Nickel-55): For better strength and cost savings
Stick welding works great for repairs in the field or when you don’t have fancy equipment.
TIG Welding (GTAW)
I’ve used TIG welding for more delicate or thin cast iron parts. It gives you more control, especially if you’re welding small cracks. But TIG welding cast iron takes skill and isn’t the first method I’d recommend for beginners.
You’ll still want to use a nickel-based filler rod with TIG welding. And be sure to clean the base metal thoroughly before starting.
MIG Welding (GMAW)
MIG welding isn’t ideal for cast iron. It doesn’t allow for the precise heat control that you need. If you’re doing small, non-critical welds and using a nickel wire, it can work. I’d say this is the least preferred method unless it’s all you’ve got on hand.
Brazing
This isn’t technically welding, but it’s one of my favorite techniques for repairing gray cast iron. Brazing uses a bronze or brass filler metal and works at a lower temperature than welding. That means less stress and less chance of cracking.
You don’t melt the base metal when brazing, so the original part stays more intact. It’s also a good choice if the part doesn’t need to be super strong.
Preheating Gray Cast Iron Before Welding
This is one of the most important steps—and one that’s often skipped. Trust me, skipping preheat is like walking a tightrope without a safety net.
Gray cast iron should be preheated slowly and evenly before welding. This helps reduce thermal shock and stress cracking.
I usually preheat to around 500°F to 1200°F depending on the thickness of the part. For large or thick parts, go higher. Thin parts might do okay at the lower end.
A propane torch works fine for small pieces, but for bigger items, you might want to use an oven or wrap it in insulation blankets.
Welding Techniques That Work
Once you’ve preheated the part, here’s how I approach the weld:
- Short welds: I only weld small sections at a time—no more than 1 inch—before stopping to let it cool or to peen it.
- Peening: This means gently hammering the weld bead with a ball peen hammer while it’s still hot. It relieves stress in the metal and helps prevent cracking.
- Controlled cooling: Don’t just leave the part to cool in the open. Wrap it in welding blankets or bury it in dry sand or ashes to slow the cooling process. It needs to cool down very slowly.
Post-Weld Heat Treatment
Even after welding, we’re not done yet. Gray cast iron benefits from slow, even cooling after the weld is complete. That means wrapping the part or putting it in an oven to slowly cool over several hours.
If you can, bring the whole part up to temperature again (around 1000°F) after welding, then reduce the heat gradually over 6 to 12 hours. I’ve even left parts wrapped overnight just to be safe.
Cleaning and Surface Preparation
Another tip I’ve learned the hard way—clean the cast iron like your life depends on it. Cast iron tends to soak up oil, grease, and other contaminants. If you weld over that, it’ll cause porosity and weak welds.
Use a wire brush, grinder, or even a degreaser to clean the surface. If the part has been in service, it’s probably full of carbon and oil, especially around cracks.
Best Electrodes and Fillers for Welding Gray Cast Iron
Here’s a simple table that can help you choose the right filler for your project:
| Filler Metal | Composition | Best For | Machinability | Notes |
|---|---|---|---|---|
| ENi-CI (Nickel-99) | 99% Nickel | High-precision repairs | Excellent | Most expensive option |
| ENiFe-CI (Nickel-55) | 55% Nickel, Iron | General repairs, moderate cost | Good | Slightly less machinable |
| Cast Iron Rod | Iron-based | When strength matters over looks | Poor | Prone to cracking |
| Bronze Brazing Rod | Copper-zinc | Low-stress parts, decorative use | Good | Requires clean surface |
When to Avoid Welding and Choose Other Repair Options
There are definitely times when welding gray cast iron isn’t the best move. If the crack is near a machined surface, threaded hole, or very thin section, brazing might be a safer route.
Also, if the part is subject to high thermal cycling or vibration, welding might not hold up long-term. In those cases, I’d look at metal stitching (a mechanical repair technique) or replacing the part altogether.
Common Mistakes to Avoid
Here are a few common mistakes I made early on and what I do differently now:
- Skipping preheat: Never weld gray cast iron cold. It almost always leads to cracking.
- Using the wrong filler: Mild steel rods will make the problem worse. Always go with nickel-based or bronze rods.
- Welding too much at once: Slow and steady wins the race. Stick to short welds.
- Cooling too fast: Let the weld cool down as slowly as possible.
Signs of a Good Weld on Gray Cast Iron
After the job is done, I check for these signs to know the weld went well:
- No visible cracks along the weld or heat-affected zone
- Smooth transition between the base metal and the weld bead
- No porosity or bubbling
- Clean and solid weld appearance
If I see tiny hairline cracks or feel roughness on the surface, I know I might have rushed it and need to go back.
Conclusion
Welding gray cast iron isn’t the easiest job, but with the right preparation, tools, and patience, it’s definitely possible.
I’ve repaired everything from engine blocks to antique iron legs with great results. The key is taking it slow, respecting the material, and not cutting corners. Remember—gray cast iron is unforgiving, but not impossible.
If you’re doing this in your garage or out on a job site, I hope this guide makes your welding journey smoother. And if you ever feel stuck, just step back, think it through, and take your time.
Frequently Asked Questions
Can you weld gray cast iron without preheating?
No, welding without preheat often causes the metal to crack. Always preheat slowly and evenly.
What is the best electrode for welding gray cast iron?
ENi-CI (Nickel-99) is the best for high-quality and machinable welds. For general use, ENiFe-CI (Nickel-55) works well too.
Can MIG welding be used on gray cast iron?
It can be, but it’s not the best method. Use only if you have no other option, and choose a nickel-based wire.
Is brazing better than welding for cast iron?
Sometimes yes, especially when the part doesn’t need to withstand high loads. Brazing creates less thermal stress.
How do I slow cool cast iron after welding?
Wrap it in welding blankets or bury it in dry sand or ashes to help it cool gradually over several hours.
Can I grind the weld after I’m done?
Yes, if you’ve used a machinable filler like Nickel-99. Be gentle to avoid stressing the weld.
What causes cracking during welding?
Thermal stress, poor preheat, fast cooling, or using the wrong electrode can all cause cracks.