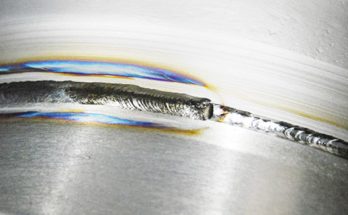
Welding cast iron to steel is one of those challenges that can seem intimidating at first, especially if you’re used to working with more compatible metals. I’ve had my fair share of trial-and-error moments with this process, and I’ll be the first to say—it takes a bit of finesse, but it’s absolutely doable.
Image by Reddit
This guide is based on hands-on experience and real-world solutions. If you’re fixing a cracked piece of machinery, fabricating a custom bracket, or tackling a creative metalwork project, I’ll walk you through the steps you need to know.
I’ll explain everything in simple terms, because I believe welding knowledge should be accessible to everyone—not just seasoned pros.
Difference Between Cast Iron and Steel


Before striking an arc, you need to understand what makes these two metals so different. Cast iron and steel might both contain iron, but their behavior under heat and stress is worlds apart.
Cast iron is brittle and high in carbon content. It’s great for strength and rigidity, but not so much for flexibility. That high carbon content is what causes problems during welding—it makes cast iron prone to cracking, especially when it cools too quickly.
Steel, on the other hand, is more ductile and weld-friendly. It handles heat well and doesn’t crack as easily. When you weld these two together, you’re basically trying to bond a flexible material to a brittle one. That’s where technique and preparation become everything.
Can You Weld Cast Iron to Steel?
Yes, you absolutely can weld cast iron to steel—but it requires careful planning, the right filler materials, and a few tricks to minimize the chances of cracking.
The biggest risk in this type of welding is that cast iron will crack either during or after welding. To avoid that, you have to treat the job with patience and precision. When I first learned how to do it, I practiced on scrap pieces to get a feel for it—and that made all the difference.
When Would You Need to Weld Cast Iron to Steel?
There are plenty of situations where welding cast iron to steel comes up, especially in repair work and custom fabrication. Here are a few examples I’ve run into personally:
- Repairing machinery frames or brackets
- Modifying exhaust manifolds
- Fabricating or reinforcing agricultural tools
- Building custom tooling for workshops
- Fixing broken castings with steel plates
Sometimes, it’s cheaper and faster to weld a steel part onto cast iron rather than replacing the whole component.
Tools and Materials You’ll Need
Welding this combination of metals takes a specific set of tools and materials. Here’s a quick table to help you prep your workspace.
| Tool/Material | Purpose |
|---|---|
| Welding machine (MIG, TIG, or Stick) | Depends on the job and your experience |
| Nickel-based filler rod or electrode | Best for bonding cast iron to steel |
| Preheating equipment (torch or oven) | To reduce cracking risks |
| Wire brush or grinder | For cleaning the surfaces |
| Clamps and jig fixtures | To hold the parts steady |
| Safety gear (gloves, helmet, jacket) | Always a must |
| Post-weld heating blanket or insulation | To control cooling |
Having everything ready before you start is key to avoiding mistakes halfway through.
Choosing the Right Welding Method
Different welding processes can be used to weld cast iron to steel, but they each have their own pros and cons. Let’s go over the most common ones.
Stick Welding (SMAW)
If you’re welding thick materials or working outdoors, stick welding might be your best bet. It’s forgiving, powerful, and works well with cast iron if you use a nickel-based rod.
Nickel 99 or Nickel 55 electrodes are popular choices. Nickel 99 is softer and easier to machine later. Nickel 55 is a bit harder but more economical.
Stick welding is the most popular option for cast iron-to-steel welding because it allows controlled heat input and works even if the metal isn’t super clean.
MIG Welding (GMAW)
MIG welding is faster and cleaner, but not always the best choice for cast iron. If you’re using MIG, you’ll need a flux-cored wire that’s designed for dissimilar metals.
In my experience, MIG can work well for smaller projects where you can control preheat and post-weld cooling carefully. It’s not great for heavy-duty cast iron jobs, though.
TIG Welding (GTAW)
TIG welding gives you the most control and the cleanest welds. If precision is important and you’ve got the skills, TIG is a fantastic choice. You’ll want to use a nickel-based filler rod.
I usually go with TIG when working on delicate repairs or high-value parts where I can’t afford to mess up. But it’s slower and more demanding than stick or MIG.
Prepping the Metal Surfaces
The success of your weld starts with how well you prepare the surfaces. This part may seem boring, but it’s what separates a good weld from a cracked one.
Clean both surfaces. Use a wire brush, grinder, or sandpaper to remove rust, paint, oil, and dirt. Cast iron is often porous, so it can hide contaminants deep inside.
Bevel the edges. If you’re doing a butt weld or joining edges, bevel them at a 30–45° angle to get better penetration.
Fit the parts tightly. Use clamps or a jig to hold them steady. You want as little movement as possible during welding.
When I’m working on older castings, I sometimes even bake them in a low oven first to drive out oil that might seep up during welding.
Importance of Preheating Cast Iron
One of the biggest mistakes I ever made was skipping preheat. The weld cracked within hours.
Cast iron hates sudden temperature changes. Preheating helps prevent thermal shock and lowers the risk of cracks. It also slows the cooling rate after welding, which is crucial.
Here’s a general guideline for preheating:
| Cast Iron Thickness | Recommended Preheat Temp |
|---|---|
| Up to ½ inch | 250–400°F (120–200°C) |
| ½ to 1 inch | 400–600°F (200–315°C) |
| Over 1 inch | 600–800°F (315–425°C) |
Use a torch, induction heater, or even an oven for smaller parts. Always heat evenly and avoid concentrating the flame on one spot.
Welding Technique Tips
Now we’re getting into the core of the process. Here’s what I’ve learned over the years about actually laying down the weld.
- Use short welds. Stitch welding is better than trying to do one long bead. It controls heat buildup and reduces stress.
- Peen the welds. After each bead, tap the weld gently with a hammer. This helps relieve internal stress.
- Keep the amperage low. Less heat means less risk of cracking, especially on the cast iron side.
- Let the part cool slowly. Don’t rush this step. Wrap it in a welding blanket or bury it in dry sand or ashes to cool overnight.
Welding cast iron to steel is about patience. I’d rather spend extra time cooling slowly than redo a cracked part the next day.
Best Filler Rods and Electrodes for Welding Cast Iron to Steel
The filler material is one of the most critical decisions in this whole process. Using the wrong rod or wire can lead to cracking, porosity, or a weak joint.
Here are the top options I personally trust:
| Filler Material | Best Use Case |
|---|---|
| Nickel 99 (ENi-CI) | Soft, machinable, best for precision |
| Nickel 55 (ENiFe-CI) | Stronger, more economical |
| Stainless Steel 309 | Works as a transition filler between cast iron and steel |
| Inconel (ERNiCr-3) | High-strength dissimilar metal welding |
If you’re just starting out, go with Nickel 99. It’s more forgiving and easier to work with, especially for delicate repairs.
Mistakes and How to Avoid Them
Even experienced welders run into trouble when dealing with cast iron. Let me save you from some headaches by sharing the mistakes I’ve made and what to do instead.
- Skipping preheat → Always preheat cast iron to avoid cracking.
- Welding too long → Use short stitch welds instead of continuous beads.
- Using the wrong rod → Go for nickel-based or stainless transition fillers.
- Fast cooling → Wrap the part or let it cool slowly in insulation.
- Dirty metal → Clean both surfaces thoroughly before welding.
The more careful you are with preparation, the more successful your weld will be.
Post-Weld Treatment
Once your weld is done, don’t just walk away. The way you treat the part after welding is just as important as the welding itself.
- Let the part cool slowly over several hours.
- Keep it insulated—use a welding blanket or bury it in dry sand.
- Inspect the weld visually for cracks or porosity.
- If needed, grind and machine the area carefully.
If everything looks good, you’re done! You’ve successfully welded cast iron to steel—a process many shy away from, but one you now know how to handle.
Conclusion
Welding cast iron to steel isn’t easy, but it’s one of those skills that can really set you apart as a welder. The first time I did it right, I felt like I had cracked some kind of secret code.
And honestly, once you understand the steps—cleaning, preheating, choosing the right filler, and controlling your weld—it becomes second nature.
Take your time, practice on scrap, and don’t rush the cooling process. Whether you’re fixing a broken part, fabricating something unique, or just experimenting with different materials, this guide should help you get it done with confidence.
FAQs
Can you weld cast iron directly to mild steel?
Yes, with proper prep, preheating, and the right filler metal, you can weld cast iron to mild steel successfully.
What welding rod is best for cast iron to steel?
Nickel 99 or Nickel 55 rods are ideal. Stainless 309 can also be used for dissimilar welding.
Do you need to preheat cast iron before welding?
Yes, preheating is crucial to prevent cracking and ensure a strong bond.
Can I MIG weld cast iron to steel?
You can, but it’s not the preferred method. TIG or Stick welding with nickel-based fillers gives better results.
Why does cast iron crack after welding?
Cracking happens due to rapid cooling and thermal stress. Preheating and slow cooling reduce this risk.