If you’ve ever found yourself holding a cracked cast iron cylinder head in your hands, wondering if it’s salvageable or ready for the junk pile, you’re not alone. I’ve been there too.
And let me tell you this—welding cast iron, especially something as important as a cylinder head, is not impossible. It just needs the right approach, patience, and a little bit of confidence.
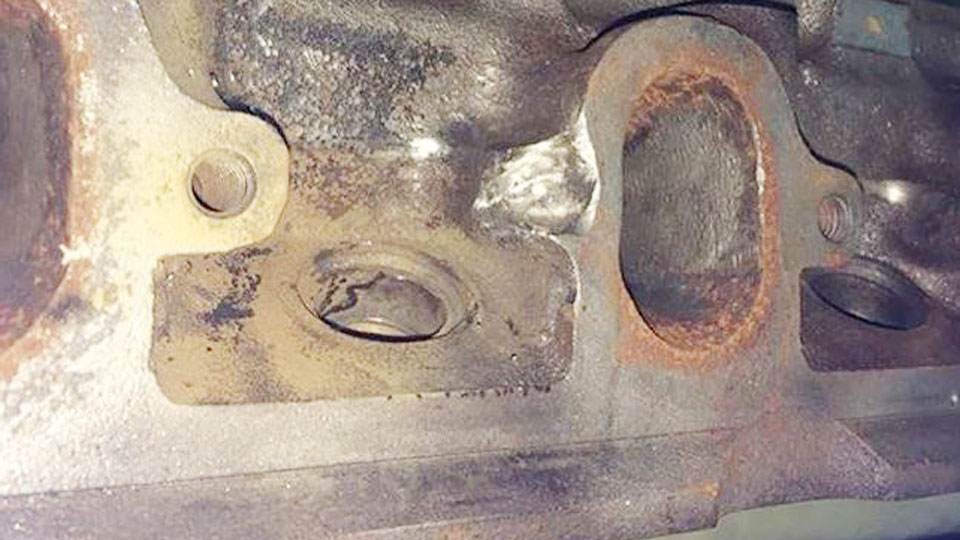
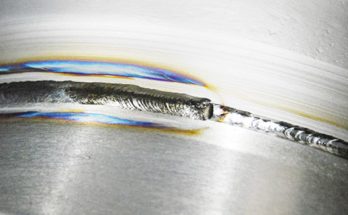
Image by 460ford
Cast iron is a tricky material to weld because of its high carbon content. It doesn’t behave like steel or aluminum. It cracks if you rush, and it doesn’t forgive mistakes. I’ve learned some solid techniques that work.
I’ve personally repaired cracked heads and seen them run again like champions. If you’re thinking of tackling this job, stick around. I’ll walk you through every step of how to weld a cast iron cylinder head safely and successfully.
Cast Iron Cylinder Heads
| # | Preview | Product | |
|---|---|---|---|
| 1 |

|
Best Welds Gas Cylinder Holder, 10 in - 10 3/4 in, Steel, Silver | Check Price on Amazon |
| 2 |

|
BEST WELDS 900-BSW-1954 - Cylinder Cap Acetylene Coarse | Check Price on Amazon |
Before jumping into the actual welding, it’s important to understand what we’re dealing with. Cast iron cylinder heads are commonly found in older engines, diesel trucks, farm equipment, and heavy machinery. They’re made to handle a lot of heat and pressure. But they’re also brittle.
Cast iron is made from iron, carbon, and silicon. The carbon in the mix makes it hard but also prone to cracking under stress or heat. That’s why welding it is so sensitive—it doesn’t like sudden temperature changes or stress.
Let me be clear. Not every cracked cylinder head is worth saving. If the crack goes through a valve seat or combustion chamber or is more than a few inches long, you may want to think twice. But for surface cracks, small fractures, or broken ears, welding is a solid repair option.
Common Types of Cracks in Cast Iron Cylinder Heads
Here are some of the most common types of cracks I’ve seen in cast iron heads:
- Cracks between valve seats – Usually caused by overheating.
- Cracks along the combustion chamber – Often due to detonation or poor cooling.
- Cracks in the water jacket area – Water intrusion during freezing temps can cause these.
- Cracked mounting ears – From over-tightening bolts or stress during engine operation.
Knowing what kind of crack you’re dealing with helps determine the repair method.
Tools and Materials You’ll Need
Welding a cast iron cylinder head is not your average backyard job. Here’s a list of tools and materials I always keep close when doing this repair:
- Nickel welding rods or wire (for stick or MIG welding)
- Cast iron TIG filler rod (if TIG welding)
- High-quality welding machine (Stick, MIG, or TIG depending on your preference)
- Die grinder or carbide burrs
- Preheat oven or propane torch
- Slow-cool insulation blankets or sand bucket
- Cleaning solvents or degreasers
- Safety gear (gloves, goggles, fireproof clothing)
- Heating thermometer (infrared works great)
If you have access to a lathe or a milling machine, even better—for resurfacing and machining work after the weld.
Choosing the Right Welding Method for Cast Iron
There are a few ways to weld cast iron, and picking the right one is key. Each one has its pros and cons depending on the situation.
| Welding Method | Best For | Pros | Cons |
|---|---|---|---|
| Stick Welding (SMAW) | Most common repairs | Affordable, accessible, good penetration | Can be messy, slag removal needed |
| MIG Welding (GMAW) | Small to moderate cracks | Easier to use, less heat input | Not ideal for deep cracks |
| TIG Welding (GTAW) | Precision repairs | Clean weld, better control | Slower, needs more skill |
| Braze Welding | Low stress cracks | Low heat input, flexible | Not as strong as fusion welding |
From my experience, I often go with stick welding using nickel rods. It offers the best mix of strength and affordability. But when a job needs a cleaner finish or more control, TIG is my go-to.
Prepping the Cast Iron Cylinder Head for Welding
This part is absolutely critical. If you skip prep, you’re setting yourself up for failure.
Here’s how I do it:
Clean the Area Thoroughly – Use a degreaser to remove oil, grime, and dirt. Then, grind out the crack using a die grinder. Open it into a “V” shape to expose clean metal.
Drill Crack Stops – Drill small holes at both ends of the crack. This stops it from spreading further.
Check for Hidden Cracks – Use a dye penetrant test to make sure you’ve found all the cracks.
Preheat the Head – Cast iron hates fast heating or cooling. Use a torch or oven to slowly heat the head to about 500°F. This prevents stress during welding.
If the part is too big for an oven, a propane torch can do the job—but go slowly and evenly.
Welding Process: Step-by-Step
Let’s get into the welding process now. This is how I personally go about it when I’m welding a cast iron cylinder head.
Choose the Right Filler Metal
Nickel-based rods like ENiFe-CI (nickel-iron) are great for strength. ENi-CI (pure nickel) is softer and easier to machine. For TIG, you can use nickel rods or stainless rods depending on the situation.
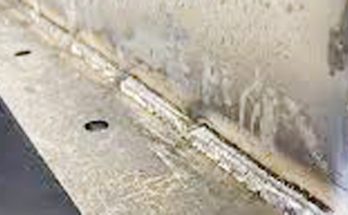
Stitch Weld in Short Passes
Weld in short ½ inch beads at a time. Peen each bead immediately after you lay it down using a small hammer. This helps relieve stress.
Never weld a long continuous bead. That will cause the head to warp or crack.
Keep the Heat Consistent
Once you start welding, try not to let the piece cool too much. If it gets too cold, reheat it. You want to maintain that 500°F range throughout the process.
Let It Cool Slowly
When you’re done, never quench or expose it to air directly. Cover the head with a welding blanket or bury it in a bucket of dry sand. Let it cool for at least 12 hours—overnight is best.
Rushing this part is where most welds fail.
Post-Weld Machining and Finishing
Once the head is cool, it’s time to bring it back to working condition.
- Grind or machine the weld smooth – Especially if it’s on a gasket surface.
- Pressure test the head – Make sure the repair holds under pressure.
- Deck the head – You may need to resurface it to make sure it seals properly when reinstalled.
If you don’t have the tools to do this at home, a machine shop can finish it up for you.
Important Tips from My Experience
Here are some lessons I’ve learned from welding cast iron heads over the years:
- Don’t skip preheating—ever.
- Use the right rod. Cheap rods lead to poor welds.
- Always drill crack stops.
- Peening works. Don’t underestimate it.
- Slow cooling is everything.
- Never over-tighten bolts during reassembly.
If you follow these principles, your chances of success go way up.
When Not to Weld
Not every cylinder head can be saved. If the crack is near a valve seat, spark plug hole, or deep inside a combustion chamber, think carefully.
Sometimes, brazing or a cold metal stitching method is better. In extreme cases, replacing the head may be the safest choice.
Conclusion
Welding a cast iron cylinder head might seem intimidating at first—but trust me, it’s a skill you can learn with patience.
I’ve fixed more than a few heads in my time, and there’s something truly satisfying about bringing one back from the dead. It’s all about preparation, using the right tools, and not rushing the process.
If you’re fixing up a tractor head from the 70s or saving a rare engine part, welding cast iron is a rewarding challenge.
Just remember to take your time, don’t cut corners, and always prioritize safety. And once you’ve done it once, you’ll gain the confidence to do it again and again.
FAQs
Can I weld a cast iron cylinder head without preheating?
No, preheating is essential. Welding without it can cause the cast iron to crack due to thermal shock.
What’s the best rod for welding cast iron cylinder heads?
Nickel rods like ENiFe-CI or ENi-CI are the best choices. They provide strong, ductile welds that can be machined afterward.
Can I use MIG welding to repair cast iron heads?
Yes, but it’s not ideal for deep cracks. Stick or TIG welding provides better penetration and control.
How do I know if the cylinder head crack is repairable?
Small cracks on flat surfaces or mounting ears are usually repairable. Cracks in valve seats or combustion chambers may not be worth the effort.
How long should I let the head cool after welding?
Let it cool very slowly—ideally overnight—using a welding blanket or dry sand for insulation.
Is cold welding or metal stitching a better option?
For some repairs, especially in sensitive areas, cold metal stitching can be safer than welding. It avoids heat stress entirely.
Can I use JB Weld or epoxy for cracked heads instead?
That can work for small, non-critical cracks. But it’s not a long-term or load-bearing solution like welding.
Do I need to machine the head after welding?
Usually, yes. Especially if you weld near a gasket surface, you’ll want to resurface it for a proper seal.