Welding stainless steel pipe with TIG welding is a skill that truly defines a welder’s craftsmanship. It’s one of those things that, once you master it, gives you a whole new level of confidence.
I still remember the first time I tackled stainless steel pipe with a TIG torch. It looked simple from a distance, but once I got started, I realized there’s a real art to doing it right.
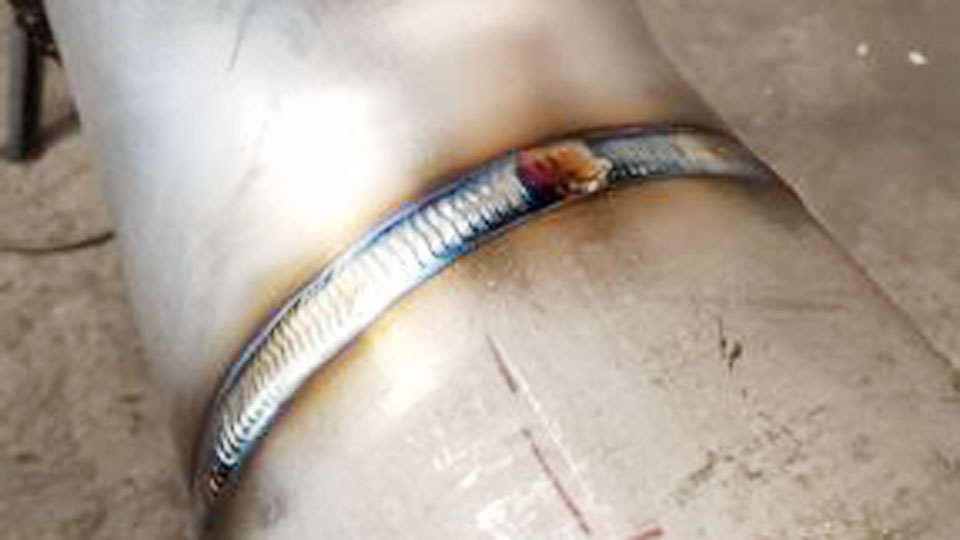
Image by reddit
If you’re someone who’s ready to step up your welding game or maybe you’ve had a few rough experiences and want to get it perfect, I’m here to walk you through the entire process. Think of me like a buddy sitting right next to you, sharing all the real-world tips that you won’t always find in a textbook.
Today, we’re going to cover everything about how to TIG weld stainless steel pipe — from preparation to techniques, and even troubleshooting common problems. By the time you finish reading, you’ll be ready to lay down clean, strong, professional welds.
What Is TIG Welding?


TIG stands for Tungsten Inert Gas welding. It’s also known as GTAW (Gas Tungsten Arc Welding).
In TIG welding, we use a non-consumable tungsten electrode to produce the weld. A shielding gas, usually 100% argon, protects the weld area from contamination.
TIG welding gives incredible control, making it the preferred method for welding stainless steel pipes, especially where appearance and precision are important.
Why Use TIG Welding for Stainless Steel Pipe?
Stainless steel is sensitive to heat. If it gets too hot, it can warp, discolor, or lose its corrosion resistance. TIG welding is perfect because it:
- Provides precise heat control
- Produces clean, high-quality welds
- Reduces the risk of contamination
- Allows for beautiful weld appearances
If you’re building sanitary systems, food-grade pipes, or any high-end project, TIG is the best option.
Essential Equipment and Materials for TIG Welding Stainless Steel Pipe
Let’s talk about what you need before striking an arc. Trust me, using the right gear makes a massive difference.
| Item | Details |
|---|---|
| TIG Welder | AC/DC inverter type, capable of pulse settings |
| Torch | Air-cooled or water-cooled torch with flexible head |
| Tungsten Electrode | 2% Thoriated (red tip) or 2% Lanthanated (blue tip) |
| Shielding Gas | 100% Argon (sometimes mixed with helium) |
| Filler Rod | ER308L, ER316L depending on stainless grade |
| Purge Gas Equipment | For backside shielding (usually argon) |
| Wire Brush | Stainless steel-only brush (never mix with carbon steel) |
| Protective Gear | Welding helmet, gloves, jacket, and safety glasses |
Having this setup ready will save you a lot of frustration.
Preparing the Stainless Steel Pipe
Preparation is where good welds start. I can’t stress this enough — if you skip prep work, even the best welder will struggle.
Here’s what I always do:
Cleaning the Pipe
- Remove any grease, oil, or dirt: Use acetone or a stainless-specific degreaser.
- Brush the weld area: Always use a stainless steel brush that’s dedicated only for stainless work. Never use a brush that’s touched carbon steel — it can cause contamination.
- Dry fit the joints: Make sure the pieces fit snugly with no big gaps.
Beveling the Edges
If the pipe wall is thick (over 1/8 inch), you’ll want to bevel the edges. A 37.5° bevel on each side is standard, leaving a small land (flat area) of about 1/16″ for better root pass control.
Purging the Inside
For stainless pipes, purging the inside with argon gas is critical. If the inside of the weld is exposed to air, it’ll oxidize and create ugly, weak welds.
Use purge dams or purge plugs to seal the ends and flood the inside with argon.
Setting Up the TIG Welder
Now that your pipes are prepped, it’s time to dial in your machine settings.
Here’s a typical starting point:
- Amperage: About 1 amp per thousandths of material thickness (for example, 1/8″ wall = around 125 amps).
- Polarity: DCEN (Direct Current Electrode Negative).
- Shielding Gas Flow Rate: 15–20 CFH.
- Pulsing: Optional, but can help with heat control and appearance.
- Post-Flow Time: Around 10-15 seconds to protect the cooling weld and tungsten.
Always run a few practice beads on scrap material to fine-tune your settings before welding the real thing.
Choosing the Right Tungsten and Filler Metal
For stainless steel pipe, I usually use:
- Tungsten: 2% Lanthanated or 2% Thoriated, sharpened to a fine point for better arc control.
- Filler Rod:
- ER308L for 304 stainless pipes
- ER316L for 316 stainless pipes
If you’re not sure, check the base metal grade and match accordingly.
Welding Techniques for Stainless Steel Pipe
Alright, now let’s dive into the actual welding. Here’s how I tackle it, step-by-step.
Tacking the Pipe
Before fully welding, you need to tack the pipe.
- Make small tacks (no bigger than a fingernail) evenly spaced around the joint.
- Purge during tacking to prevent inside oxidation.
- Align carefully because once you start welding, you can’t push or pull the joint into place easily.
Root Pass
This is the first weld, and it’s the most important. A good root pass sets the foundation for the rest of the weld.
Tips for a great root pass:
- Use a slight keyhole technique: Control the puddle so it fully penetrates without sagging inside.
- Keep the tungsten close but don’t dip it.
- Back-purge the inside to keep the root nice and shiny.
I prefer a walking-the-cup technique if possible, but freehanding can work for smaller diameter pipes.
Hot Pass
After the root, the hot pass reinforces the joint and smooths out any irregularities.
- Higher amperage than the root pass.
- Watch for heat buildup and adjust travel speed as needed.
- Feather the edges for blending with the fill passes.
Fill Passes
These fill the groove to near flush.
- Stack the puddles neatly and consistently.
- Add filler rod steadily without starving or flooding the puddle.
- Use a weave or stringer beads depending on the pipe size and your technique.
Cap Pass
The cap is the final layer — it’s the one everyone will see, so make it beautiful.
- Lower your amperage slightly for better control.
- Walk the cup if you can, keeping a steady rhythm.
- Aim for slight reinforcement (but don’t make a fat weld).
You want smooth, consistent “stacked dime” ripples that are flush with the pipe surface.
Controlling Heat Input
Stainless steel doesn’t like too much heat. Here’s how to manage it:
- Use pulse settings if available (for pulsing heat input).
- Move quickly but steadily to avoid heat buildup.
- Let the work cool between passes if needed.
You’ll notice if the material starts turning blue or brown — that’s a sign you’re overheating.
Common Problems and How to Fix Them
Here are some real-world challenges and how I handle them:
| Problem | Cause | Solution |
|---|---|---|
| Sugaring (gray crust inside) | Inadequate purge | Improve purge setup, slow down travel |
| Warping | Excessive heat input | Lower amperage, use chill bars |
| Lack of fusion | Low heat or poor technique | Increase amperage slightly, slow down |
| Contamination | Dirty filler or tungsten dipping | Keep everything clean, sharpen tungsten |
Experience will teach you to spot and fix these issues quickly.
Final Cleaning After Welding
Once you’re done, it’s good practice to:
- Brush the weld with a stainless wire brush.
- Use a pickling paste if appearance is critical and you want to remove heat tint.
- Wipe down with acetone to remove any residues.
This keeps the weld looking clean and ensures maximum corrosion resistance.
Conclusion
Learning how to TIG weld stainless steel pipe isn’t just about technical skills — it’s about patience, attention to detail, and practicing the right habits. It can be intimidating at first, but once you get the feel for it, there’s nothing more satisfying than laying down a perfect, shiny weld on stainless pipe.
By prepping properly, setting up your equipment the right way, controlling heat, and practicing solid techniques, you’ll be on your way to producing professional-grade welds. I truly believe anyone willing to put in the time and care can master this.
FAQs
What type of gas is used for TIG welding stainless steel pipe?
We typically use 100% pure argon gas for TIG welding stainless steel pipe.
Why is purging important when TIG welding stainless steel pipe?
Purging fills the inside of the pipe with argon gas, preventing oxidation (sugaring) that weakens the weld and damages corrosion resistance.
What is the best tungsten to use for stainless steel TIG welding?
2% Lanthanated or 2% Thoriated tungsten electrodes are great choices for stainless steel TIG welding.
How do I prevent warping when TIG welding stainless steel pipe?
Control your heat input by using lower amperage, moving steadily, using pulse settings if available, and allowing the pipe to cool between passes.
Can I TIG weld stainless steel pipe without filler rod?
Yes, in some thin-wall applications you can fuse the joint without filler, but most pipe welding requires filler rod for strength and proper joint filling.