Have you ever needed to join galvanized steel for a home project, a repair, or even something creative, like crafting or metal art? I’ve been there. It might seem tricky at first, but once you get the hang of it, soldering galvanized steel can actually be a smooth and rewarding process.
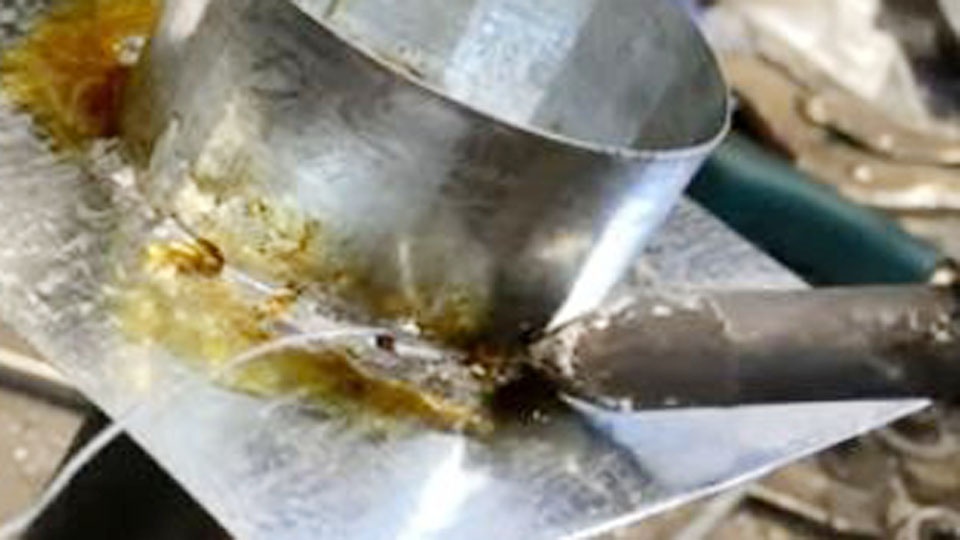
Image by cookingintheshopwithmark1222
Galvanized steel is commonly used because it’s durable and corrosion-resistant, thanks to its protective zinc coating. But when it comes to soldering, that same zinc layer can get in the way if you’re not careful.
I’ve worked on several galvanized steel projects over the years, and through a mix of research and hands-on trial and error, I’ve learned what works and what doesn’t.
In this article, I’ll walk you through the exact process I follow when soldering galvanized steel. I’ll also explain why each step matters, what tools to use, and how to avoid common problems. If you’re a weekend warrior or someone looking to learn new skills, this guide is here to help.
What is Galvanized Steel?
Before we jump into soldering, it’s helpful to understand what galvanized steel actually is. Galvanized steel is just regular steel that’s been coated with a layer of zinc.
This coating protects the steel from rust and corrosion, making it ideal for outdoor use, plumbing, roofing, and even fencing.
The most common method of galvanizing is hot-dip galvanization. In this process, the steel is dipped into molten zinc. Once it cools, that zinc coating becomes a protective barrier.
Zinc has a much lower melting point than steel. When you’re soldering, you have to be extra careful not to overheat the metal. Otherwise, the zinc can burn off, release toxic fumes, or interfere with the bond.
Why Solder Galvanized Steel?
You might be wondering why someone would solder galvanized steel in the first place when welding or mechanical fasteners are available. Soldering is perfect for lighter-duty tasks, especially when you’re working with thin sheets or wires. It’s also great for sealing joints without distorting the metal or risking rust at connection points.
Some common uses include:
- HVAC ductwork repair
- Sheet metal fabrication
- Plumbing connections
- Artistic or decorative projects
- Joining lightweight steel parts
Soldering is less aggressive than welding. It requires lower heat and doesn’t melt the base metal, making it a cleaner option for delicate work.
Safety First: Important Precautions Before Soldering
I can’t emphasize this enough—safety comes first. Galvanized steel can release dangerous zinc oxide fumes when heated too much.
These fumes can cause metal fume fever, which feels a lot like the flu and is definitely not something you want to experience.
Here’s what I always do before I start:
- Work in a well-ventilated area, preferably outdoors or with an exhaust fan.
- Wear a respirator if working indoors.
- Use safety goggles to protect your eyes from sparks or splashes.
- Wear heat-resistant gloves to avoid burns.
- Avoid prolonged exposure to fumes by taking breaks.
Better safe than sorry, right?
Tools and Materials You’ll Need
Let’s talk tools. You don’t need a massive workshop setup to solder galvanized steel. Most of what you need is relatively affordable and easy to find at hardware stores.
Here’s a basic list of what I use:
| Item | Purpose |
|---|---|
| Soldering iron or torch | Provides the heat needed to melt solder |
| Flux | Helps clean the metal and promote good bonding |
| Lead-free solder | Joins the metal pieces together; make sure it’s suitable for steel |
| Sandpaper or wire brush | Removes zinc coating or oxidation |
| Cleaning solvent/alcohol | Degreases the surface before soldering |
| Clamps or vise | Holds the metal pieces in place |
| Wet rag | For cooling the joint and wiping excess solder |
| Safety gear | Goggles, gloves, and a mask for fume protection |
Once you’ve got everything ready, the fun begins.
Surface Preparation is Everything
I’ve learned this the hard way: if you don’t prep the surface correctly, your solder joint won’t hold. Galvanized steel has that zinc coating which can block the solder from sticking properly.
So here’s what I always do before touching the soldering iron:
Clean the Metal Thoroughly
First, I clean the surface with a bit of rubbing alcohol or acetone. This removes any oil, grease, or dirt that could mess with the solder.
Sand or Scrape Off the Zinc Coating
This part is critical. Using a piece of sandpaper or a wire brush, I gently remove the zinc layer from the area I plan to solder. It doesn’t need to be deep—just enough to expose the steel underneath.
Apply Flux Immediately
As soon as I expose the steel, I apply a layer of flux. Flux helps prevent oxidation and allows the solder to flow smoothly. It also ensures the joint forms a strong bond.
If you wait too long after sanding before applying the flux, the steel can oxidize again. Always go from sanding to fluxing in one smooth move.
Applying the Heat: Soldering Process Step-by-Step
Alright, now we’re getting into the heart of the process. Once everything’s prepped, it’s time to heat things up.
Here’s how I solder galvanized steel, step by step:
Secure the Metal Pieces
I use clamps or a vise to hold everything in place. You don’t want the pieces shifting while you’re working. It’s frustrating and can mess up the joint.
Heat the Joint Evenly
Using a soldering iron or a propane torch, I gently heat the joint area. I move the heat source around to warm it up evenly. I never heat the solder directly—just the metal.
Feed the Solder to the Joint
Once the metal is hot enough, I touch the solder to the joint—not the flame. The solder should melt on contact and flow into the gap between the pieces. If it doesn’t melt, the metal isn’t hot enough yet.
Let It Flow and Fill
I let the solder flow naturally along the joint. Capillary action will pull the molten solder through the joint if it’s clean and hot enough.
Cool Down Gradually
Once the solder has filled the joint, I let it cool slowly. Avoid blowing on it or using water to cool it quickly. That can create weak spots.
Clean Off Excess Flux Residue
After everything’s cooled down, I wipe away any remaining flux residue using warm water or alcohol.
And just like that, you’ve got a clean, solid solder joint.
Common Mistakes to Avoid
Trust me, I’ve made them all. Here are some of the most common mistakes people make when soldering galvanized steel—and how to avoid them:
Not removing the zinc coating: Solder won’t stick to zinc. You need to expose bare steel underneath.
Skipping the flux: Flux is essential. Without it, oxidation builds up and the solder won’t flow.
Overheating the metal: Too much heat burns off zinc, releases toxic fumes, and weakens the steel.
Touching the solder directly with the torch: Always heat the metal, not the solder. Let the metal melt the solder.
Rushing the process: Take your time with heating, soldering, and cooling. It really does make a difference.
Choosing the Right Solder and Flux
There are many types of solder and flux out there, so it’s easy to feel overwhelmed. For galvanized steel, I always use a lead-free solder that’s designed for ferrous metals.
A rosin-core solder can work for electrical joints, but for structural or mechanical connections, I go with a solid-core solder and apply separate flux.
As for flux, acid-based flux works best for metal-to-metal connections. Just be sure to clean off all residue afterward to prevent corrosion.
Here’s a quick comparison to help:
| Type of Flux | Best For | Notes |
|---|---|---|
| Rosin-based | Electronics | Not ideal for galvanized steel |
| Acid-based | Metal repairs | Strong cleaner, must remove residue |
| Water-soluble | General-purpose metal soldering | Easy to clean, decent strength |
Tips for Better Results
Over time, I’ve picked up a few tips that really make a difference:
- Pre-tin the surfaces if possible. Coat each surface with a thin layer of solder before joining them.
- Use heat sinks like metal clips if you’re worried about warping nearby parts.
- Practice on scrap pieces before working on your actual project.
- Always double-check your safety setup before lighting your torch.
These small habits can take your work from good to great.
What If the Joint Fails?
Sometimes a joint just doesn’t hold. If that happens, don’t panic. Usually, it’s one of three things:
- Dirty or greasy surface
- Inadequate heat
- Poor solder quality
When I get a bad joint, I go back, clean everything up again, reapply the flux, and start fresh. Nine times out of ten, that solves the problem.
When to Use Soldering Instead of Welding
I’ve had folks ask me, “Why not just weld it?” The answer depends on your project. Soldering is great for thin materials, temporary fixes, and decorative work. Welding, on the other hand, is more permanent and better for heavy-duty jobs.
Soldering is your go-to method when:
- You’re working indoors and want to avoid sparks.
- The metal is too thin for welding.
- You need a clean, smooth finish.
- You’re connecting dissimilar metals.
Just choose the method that fits your project needs best.
Conclusion
Soldering galvanized steel might feel intimidating at first, especially with that zinc coating and the risk of toxic fumes.
Once you understand the steps and follow them carefully, it’s honestly not that hard. I’ve used this process for everything from small repairs to custom metal art pieces, and it works like a charm when done right.
The key is in the prep work—cleaning, sanding, and fluxing—and then heating the joint evenly. Don’t rush it. Take your time, use the right tools, and always prioritize safety. Once you get that down, soldering galvanized steel becomes a super useful skill to have in your toolbox.
If you’re sitting here wondering whether you can do it, my answer is: yes, you absolutely can.
FAQ
Can you solder galvanized steel without removing the zinc coating?
No, it’s best to remove the zinc coating from the soldering area. The solder won’t bond properly to the zinc and may create a weak joint.
Is it safe to solder galvanized steel indoors?
Only if you’re using proper ventilation. Zinc fumes are toxic, so always use a fan, fume extractor, or work near an open window.
What type of solder is best for galvanized steel?
Use lead-free solder made for metal repairs. Solid-core solder with acid flux is a strong choice.
Do I need to use flux when soldering galvanized steel?
Yes, flux is necessary. It cleans the metal and helps the solder flow and bond correctly.
Can you use a soldering iron on galvanized steel?
Yes, but only for small parts or thin materials. For thicker metal, a propane torch is more effective.
Why is my solder not sticking to the galvanized steel?
The most common reasons are a dirty surface, lack of flux, or the metal not being hot enough.
Is soldering strong enough for structural projects?
Not really. Soldering is better for light-duty or decorative projects. For structural strength, welding is the better option.