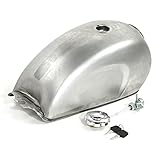
I remember the first time I looked at an old, rusty motorcycle gas tank and asked myself, “Can I really weld this thing safely?” It’s a common question for DIY enthusiasts and beginner welders. If you found a vintage bike at a swap meet or you’re fixing a leak in your daily rider, the idea of welding a gas tank can sound intimidating—and it should. You’re dealing with something that once held fuel, after all.

Photo by lowbrowcustoms
With the right steps, a lot of caution, and a bit of know-how, it’s entirely possible. I’ve done it myself more than once, and I’ll walk you through what you need to know if you’re thinking about doing it too.
Let’s take it slow and steady, like you’re sitting in the garage next to me with your tools in hand. I’ll break down the risks, preparations, and steps you need to follow to do it the right—and safe—way.
Understanding the Risks First


Before we jump into how to weld a gas tank, we need to talk about why it’s considered dangerous.
Even if a tank looks empty, gasoline residue and vapors can linger inside. Those vapors are flammable, and when exposed to the heat and sparks from welding, they can ignite or even explode. That’s why safety is the number one priority here.
You never want to weld on a tank that hasn’t been properly cleaned and vented. Don’t skip this part. Trust me, it’s not worth the risk.
Why Would You Weld a Motorcycle Gas Tank?
Let’s say you’ve got an old gas tank with a pinhole leak, or maybe you want to modify the shape for a custom build. Welding is often the best way to make those repairs or adjustments permanent and solid.
Here are a few common reasons people weld motorcycle tanks:
| Purpose | Description |
|---|---|
| Fixing a leak | Often from rust, pinholes, or a crack after an accident. |
| Customizing the tank | Changing the shape or design for a unique look. |
| Repairing a seam or bracket | Mounting tabs or seams may crack over time. |
| Replacing a bung or filler neck | Updating or repositioning fuel inlets or outlets. |
I’ve done all of these at different points. Each has its challenges, but they’re all possible with patience.
Cleaning the Tank Properly
If there’s one part of this job that makes the biggest difference in safety, it’s cleaning the tank. You absolutely cannot weld a gas tank without fully cleaning it out first.
Here’s how I do it:
Step 1: Drain all fuel
Start by removing all gasoline. Leave the cap off and let it air out outdoors for several hours.
Step 2: Rinse with soapy water
Fill the tank with hot water and a heavy dose of dish soap. Shake it around to loosen residue, then dump it out.
Step 3: Use a tank cleaner or degreaser
There are products made just for this. I use a strong degreaser and let it sit inside the tank for a few hours. It cuts the remaining fuel residue.
Step 4: Rinse with water again
Flush everything out and repeat until the water runs clear and you no longer smell gasoline.
Step 5: Purge the tank
This is crucial. I like to purge the tank with an inert gas like argon or carbon dioxide for 20-30 minutes before welding. If you don’t have that option, leave it filled with water right up to the point of welding, then drain it immediately before welding.
Some people use exhaust gas from a running car through a hose to purge the tank—it’s a clever budget-friendly method, but you need to do it outside.
Tools You’ll Need
Welding a motorcycle gas tank isn’t too different from any other metalwork, but you’ll want the right tools for the job.
Welding Machine
I’ve had the best luck using TIG welding on gas tanks. It gives you better control and precision, especially for thinner metal. MIG works too, but there’s more heat and spatter, which can cause burn-through on old steel.
Protective Gear
Helmet, gloves, fire-resistant clothing—don’t skimp on safety.
Clamps and Fixtures
To keep everything stable while welding. A tank that moves mid-weld can ruin your day.
Wire Brush and Grinder
You’ll want a clean surface around the weld area.
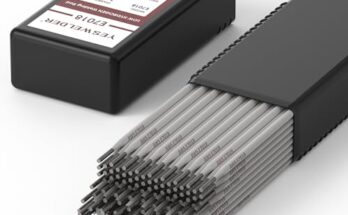
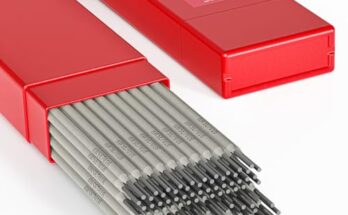
Filler Rods
Use the correct filler material for the type of steel or aluminum the tank is made from. Most motorcycle tanks are mild steel, so ER70S-2 filler works great.
Inspecting the Damage or Modification Area
Before you spark up the welder, inspect the tank carefully. If you’re fixing a leak, find the exact location and mark it. If you’re doing customization work, take measurements and draw out your cuts.
Pay attention to rust. If the metal is too thin, it might not be worth welding. In that case, patching or replacing the area with fresh steel is the way to go.
When I work on a rusty tank, I like to sandblast or use a wire wheel to clean it up completely before welding. A clean weld zone gives you a stronger, better-looking weld.
How to Weld the Tank Step-by-Step
Here’s the general welding process I follow:
Step 1: Vent and prep the tank
Make sure there’s no pressure inside and that it’s purged and safe.
Step 2: Clean the metal
Use a grinder or sanding disc to remove paint, rust, and dirt around the weld area.
Step 3: Fit the patch or align the crack
If you’re patching, cut a piece of mild steel to match the hole. Clamp it tight. If you’re fixing a crack, make sure the pieces are flush and secure.
Step 4: Tack weld
Lay a few tack welds to hold everything in place. This prevents movement during welding.
Step 5: Weld in short bursts
Gas tanks are thin, so welding in short sections helps control heat and avoid warping.
Step 6: Let it cool
I let it cool naturally. Don’t quench it with water, or you risk distorting the shape.
Step 7: Grind and finish
Grind your weld smooth if you plan to repaint the tank. If it’s a custom job, sometimes I leave the welds visible—it looks tough.
Testing for Leaks After Welding
You’re not done until you’re sure it doesn’t leak. Here’s how I test:
Soap and Air Method: I seal all openings except one and pressurize the tank gently with 5-10 PSI of air. Then I spray soapy water over the weld area. If bubbles form, you’ve got a leak to fix.
Water Fill Test: I fill the tank with water and check for drips. This is safer than using air if you’re unsure about your welds.
Fix any leaks immediately. It’s easier now than after you’ve painted and mounted the tank.
Painting and Finishing the Tank
Once you’re sure the weld is solid and the tank holds pressure, you can prep it for paint. I use automotive-grade primer, base coat, and clear coat. Don’t forget to sand the surface smooth before priming.
If you’re going for a raw metal look, apply a rust inhibitor or clear coat to protect it.
Alternative Options if You’re Not Confident
Welding a gas tank isn’t for everyone. If you’re not confident in your skills or don’t have the right equipment, consider these options:
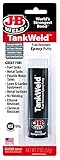
- Epoxy fuel tank repair kits – Temporary, but can work for small leaks.
- Brazing or soldering – Less heat than welding, but still requires safety precautions.
- Professional welding service – Worth the money for peace of mind.
Don’t risk your safety if you’re unsure. There’s no shame in calling in a pro.
Maintenance Tips After Welding
Once you’ve repaired or modified your gas tank, it’s smart to check it regularly.
- Inspect for leaks every few months.
- Keep the tank full to prevent internal rust.
- Add a fuel filter to catch any debris from the repair process.
- Drain and clean the tank annually if your bike sits for long periods.
These small habits will make your repair last a lot longer.
Conclusion
So, can you weld a motorcycle gas tank? Absolutely—if you take it seriously and go step-by-step. I’ve done it myself, and while it takes patience and respect for safety, it’s a very satisfying repair.
You get to save a tank that would’ve been tossed away, or create something totally custom. And nothing beats that feeling when you pour fuel into a tank you fixed with your own hands and hit the road.
If you’re sitting here wondering if you can do it, let me say this—you can. Just be careful, take your time, and always respect the fire.
FAQs
Can I weld a gas tank without removing it from the bike?
No, you should always remove the tank before welding. It’s unsafe to work on a fuel container still attached to the bike. You need space, safety, and ventilation.
Is TIG or MIG better for welding a motorcycle gas tank?
TIG welding is usually better because it offers more control on thin metal and cleaner welds. MIG works too but requires more heat management.
How long should I wait after cleaning before welding a tank?
Once you’ve purged the tank and are sure there are no fumes, you can weld immediately. Just make sure it’s dry and ventilated.
Can I use water inside the tank while welding?
Yes, some welders fill the tank with water to displace vapors and reduce fire risk. It works well if you drain the water just before welding.
What should I do if my weld still leaks?
You can grind out the weld and re-weld it or apply a fuel tank sealer inside the tank. Test again before using.
Is it legal to weld a motorcycle gas tank in the USA?
Yes, but local codes and EPA regulations may apply if you’re doing it professionally. Always follow safety standards.
Can I paint over a welded tank?
Yes, just be sure the weld is clean, smooth, and primed properly before applying paint.
What if the tank is aluminum?
Aluminum tanks require TIG welding and a bit more experience. It’s doable, but trickier than steel. Use the correct filler rod and settings.