If you’ve ever tried soldering stainless steel wire and found yourself frustrated, you’re not alone. I remember the first time I attempted it — I thought it would be like working with copper or brass. It wasn’t. Stainless steel doesn’t behave the same way.
It’s tough, it resists heat, and it doesn’t bond as easily. Once I understood what makes stainless steel different, and I learned the right steps, it became a whole lot easier.
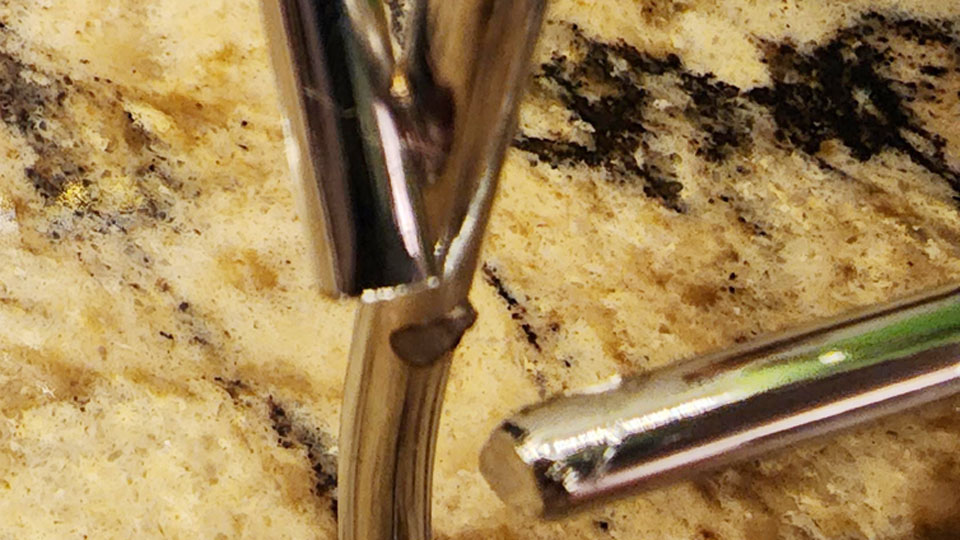
Image by reddit
I’ll walk you through everything I’ve learned about how to solder stainless steel wire. Whether you’re fixing jewelry, building a model, or crafting your next art project, I’ll explain the tools, techniques, and tips that have worked best for me. I’m writing this just like I would if you were sitting right next to me, asking for help. So let’s get into it.
What Makes Stainless Steel Hard to Solder?


Stainless steel is known for its strength and resistance to rust and corrosion. That’s what makes it so popular in construction, food processing, medical tools, and even home appliances. But these same features make it tricky to solder.
The outer layer of stainless steel forms a passive oxide coating. This layer protects the metal from rust, but it also prevents solder from sticking. Regular solder and flux that work fine on copper just won’t do the job here. You need the right materials and preparation.
What You Need Before You Start
Let’s talk about tools and materials. Here’s a list of what I personally use every time I solder stainless steel wire:
Essential Tools and Materials:
| Item | Description |
|---|---|
| Stainless Steel Wire | Choose the gauge you need. I often work with 18 to 24 gauge. |
| Soldering Iron or Torch | I use a soldering iron with adjustable temperature for smaller wire. For heavier gauge, a small torch works better. |
| Silver-Bearing Solder | Silver solder bonds well with stainless steel. Avoid acid core solder. |
| Stainless Steel Flux | Use a flux specifically made for stainless steel. I use a liquid flux that contains zinc chloride. |
| Wire Brush or Sandpaper | To clean the wire and remove the oxide layer. |
| Rubbing Alcohol or Acetone | For degreasing the surface. |
| Clamps or Helping Hands | To keep the wire stable while you work. |
| Safety Gear | Gloves, safety glasses, and a mask for fumes. |
The key players here are silver solder and stainless steel flux. These are not optional — they’re absolutely necessary to make the solder stick and hold properly.
Cleaning the Stainless Steel Wire
This is the first and one of the most important steps. You want the wire to be completely clean before applying any flux or heat.
Here’s how I do it:
- Take a fine grit sandpaper or a stainless steel wire brush.
- Scrub the part of the wire that will be soldered until it looks shiny.
- After sanding, wipe the area with rubbing alcohol or acetone to remove grease or oils.
I never skip this step because even a little dirt or oil can ruin the bond. A clean surface gives you the best chance for the solder to grab on.
Applying the Right Flux
Now let’s talk flux. Regular flux won’t cut it here. You need flux made for stainless steel — it’s usually a bit more aggressive and contains additional chemical agents that eat through the oxide layer.
Shake the bottle well if you’re using liquid flux, then apply a small amount to the cleaned area using a brush or cotton swab.
I apply just enough to coat the wire but not so much that it drips. Once it’s on, I give it a moment to settle before applying heat.
Heating the Wire Properly
This part requires a little patience and practice. Stainless steel takes longer to heat up compared to softer metals.
If I’m using a soldering iron, I let it heat up fully before touching the wire. For heavier gauge wire, I switch to a small butane torch. I’ve found that direct flame works faster on thicker stainless.
The trick is to heat the wire, not the solder. I point the flame or iron tip at the wire just below where I want the solder to flow. Once the wire is hot enough, I touch the solder to the joint, not the iron.
You’ll know it’s working when the solder melts and flows smoothly around the joint. It should look shiny and form a small bead or fillet, not a blob.
Letting It Cool
Once the solder flows and you’ve got a solid joint, it’s tempting to poke at it. Don’t do that.
Let the joint cool naturally. Avoid blowing on it or dunking it in water. Rapid cooling can make the joint brittle. I usually just sit back for a few seconds and admire the shine. Once it’s cool to the touch, it’s ready for inspection.
Cleaning Up the Joint
After soldering, there will likely be some leftover flux residue. It can be corrosive over time, so you’ll want to clean it off.
Here’s how I do it:
- Use warm water with a bit of dish soap and a soft brush.
- Scrub the joint gently.
- Rinse well and dry thoroughly.
Sometimes I’ll go over the joint lightly with steel wool to polish it up. If you’re working on jewelry or decorative pieces, this makes it look much cleaner and more professional.
Testing the Strength of the Joint
This is something I always do before calling a job finished. Even if it looks perfect, you want to make sure it will hold under pressure.
I gently tug on both ends of the wire. If the joint doesn’t budge, it’s solid. If it breaks or moves, I go back and start over. Usually, if it fails, it’s either due to poor cleaning or not enough heat.
Troubleshooting Common Problems
If your solder isn’t sticking or your joint is weak, don’t worry. It happens. Here are a few things I look for when something doesn’t go right.
Common Issues and Fixes:
| Problem | Likely Cause | Solution |
|---|---|---|
| Solder won’t stick | Wire not clean or wrong flux | Clean thoroughly and use stainless steel flux |
| Solder beads up and rolls off | Surface too cold or oxidized | Heat the wire more evenly, reapply flux |
| Joint is dull and brittle | Overheating or contaminated solder | Use proper heat and clean solder |
| Flux burns off quickly | Using wrong type or too much heat | Switch to high-temp stainless flux, adjust flame |
I always remind myself that soldering stainless steel is a bit of an art. It gets easier the more you practice.
When to Use Soldering Instead of Welding
Sometimes people ask me, “Why solder and not weld?” It’s a fair question. Welding and soldering both have their place, but they’re very different.
Soldering is great when you’re working on:
- Jewelry or small wire crafts
- Electrical projects that require minimal heat
- Thin gauge materials that would warp under high temperatures
- Temporary or semi-permanent joints
Welding is better for structural jobs or anything that needs to carry a heavy load. But for small stainless steel wire connections, soldering is the perfect balance of strength, flexibility, and control.
Choosing the Right Solder for Stainless Steel
Let’s look a bit deeper at solder options. The solder you use really matters.
I usually go for silver-bearing solder. It has a higher melting point and forms a stronger bond with stainless steel. Plus, it looks cleaner and holds up better over time.
Here’s a quick breakdown:
| Type of Solder | Use Case | Melting Point |
|---|---|---|
| Silver-bearing solder | Best for stainless steel wire | Around 430°F to 650°F |
| Lead-free solder | Good for general use, not ideal for stainless | 420°F to 460°F |
| Acid-core solder | Avoid for stainless, not strong enough | ~400°F |
If you want a long-lasting connection, always reach for silver solder with matching flux.
Safety Tips When Soldering Stainless Steel
I can’t stress this enough: safety first. When working with flux and high heat, you’re dealing with fumes and hot metals.
Here’s what I always do:
- Ventilation: Work in a well-ventilated space or use a fume extractor.
- Eye protection: Always wear safety glasses, even for quick jobs.
- Gloves: Protect your hands from burns and chemicals.
- Fire safety: Keep a fire extinguisher nearby. Accidents happen fast.
Also, be careful with fluxes. Many stainless steel fluxes contain acids or corrosive agents. Wash your hands after handling them.
Final Thoughts on Soldering Stainless Steel Wire
Soldering stainless steel wire can seem like a challenge at first, but once you understand the process, it becomes a skill you can rely on. If you’re building a piece of art, fixing something around the house, or working on an electrical project, soldering offers a neat and professional finish.
It’s all about preparation. Clean the wire well, use the right flux and solder, and apply heat with care. Don’t rush it. Let each step do its part, and you’ll end up with a strong, clean joint every time.
The satisfaction of seeing a shiny, solid joint that you made with your own hands is worth every bit of the effort. If you follow the tips I’ve shared here, I’m confident your next project will turn out great.
Frequently Asked Questions
Can you solder stainless steel wire with regular solder?
No, regular solder usually doesn’t bond well to stainless steel. You need silver-bearing solder and special stainless steel flux for a strong connection.
Do I need to use flux when soldering stainless steel?
Yes, always. Stainless steel forms an oxide layer that prevents solder from sticking. Flux helps break down that layer and allows solder to flow and bond.
Can I use a regular soldering iron on stainless steel wire?
Yes, for thin wire. But make sure the iron gets hot enough, and use silver solder with stainless flux. For thicker wire, a torch might be better.
Why won’t the solder stick to my stainless wire?
It could be because the wire wasn’t cleaned properly, or you didn’t use the right flux. Try sanding the surface again and reapplying stainless steel flux.
Is soldering as strong as welding?
Not quite. Welding is generally stronger and better for structural work. Soldering is best for small or delicate jobs like jewelry or electronics.
What temperature should I use to solder stainless steel?
You’ll need a soldering iron or torch that can reach at least 600°F. Silver-bearing solder melts at higher temperatures than lead-based types.
Is silver solder food-safe for stainless steel projects?
Some silver solders are food-safe, but it depends on the alloy. Make sure to check the product label if that’s important for your project.