I still remember the first time I had to join an aluminum pipe to a copper fitting. I scratched my head, tried a few things, and made more mistakes than I can count. Through all that trial and error, I finally figured it out. And now, I’m here to help you avoid those same mistakes.
If you’re wondering how to braze aluminum to copper at home or in your workshop, you’ve come to the right place.
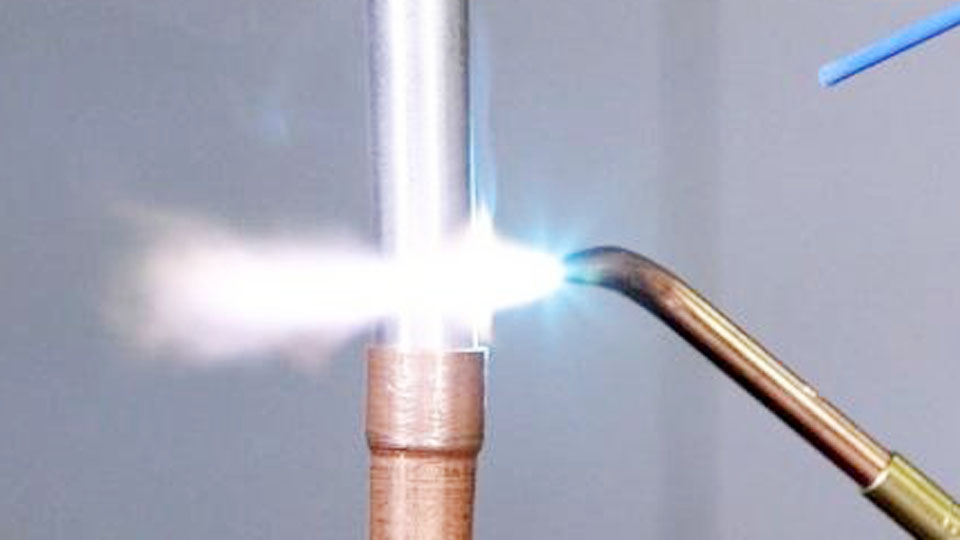
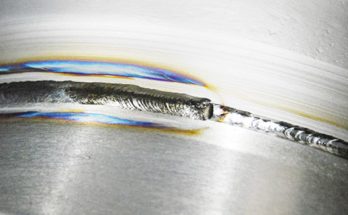
Photo by thefabricator
Let’s take a calm and practical walk through the entire process. You don’t need to be an expert welder or have a fully stocked fabrication shop. With the right tools, a bit of patience, and the right knowledge, you’ll get the job done just fine.
I’ll explain everything I’ve learned, from tools to temperatures to techniques. This is your go-to guide to get it right the first time.
Basics of Brazing Aluminum to Copper


Brazing is a joining method where you melt a filler metal and let it flow into the joint. Unlike welding, you’re not melting the base metals themselves. The filler holds everything together. The key here is choosing the right filler and keeping the metals clean.
Joining aluminum to copper is tricky. That’s because the two metals behave very differently when they’re heated. Aluminum has a lower melting point and forms an oxide layer quickly.
Copper, takes more heat and conducts it super-fast. So balancing the temperature is the biggest challenge.
But don’t worry—I’ll show you how to work around that.
Tools and Materials You’ll Need
Here’s a quick rundown of the tools and materials I personally use when brazing aluminum to copper. Having the right gear makes everything smoother.
| Tool/Material | Purpose |
|---|---|
| Brazing torch | For heating the joint evenly |
| Aluminum-to-copper brazing rods | Special filler metal designed for dissimilar joints |
| Stainless steel brush | To clean the surfaces before brazing |
| Sandpaper or emery cloth | For prepping the aluminum and copper |
| Flux for aluminum | Prevents oxidation and helps the filler flow |
| Heat-resistant gloves | Keeps your hands safe from burns |
| Safety glasses | Eye protection is a must |
| Clamps or vise | To hold the metals steady while working |
Make sure the brazing rods you get are made specifically for aluminum-to-copper joining. Not all rods will work, so double-check the packaging or ask at your local welding supply store.
Cleaning the Metals Before You Begin
Preparation is half the battle. If the metals aren’t clean, the brazing rod won’t stick. So take a few minutes to clean both the aluminum and copper surfaces thoroughly.
Start with the stainless steel brush and sandpaper. I usually scrub the aluminum to remove the oxide layer. That layer forms quickly and prevents bonding, so you need to clean it right before brazing. Use light pressure so you don’t gouge the surface.
Do the same for the copper. It usually has tarnish or grime from sitting around. Clean, shiny metal gives the best result.
Once they’re clean, avoid touching the joint area with your fingers. Oils from your skin can mess things up.
Applying the Right Flux
Now comes the flux. This stuff is essential when brazing aluminum. Without it, the oxide layer reforms as soon as you start heating, and the filler won’t flow properly.
Choose a flux that’s made for aluminum. I usually apply it with a small brush, making sure the entire joint area is covered. Don’t go overboard, but don’t miss any spots either.
Flux helps keep the metal clean during the heating process. It also tells you when the metal is hot enough—many aluminum fluxes turn clear or change color when it’s time to apply the filler rod.
Proper Fit-Up and Joint Design
Before heating anything, make sure your aluminum and copper pieces fit snugly together. Gaps make brazing harder because the filler metal has to bridge too much space. A tight fit helps the filler flow through the joint like water through a crack.
Lap joints work better than butt joints in this case. In a lap joint, one piece overlaps the other, giving you more surface area for bonding. That’s especially helpful when brazing dissimilar metals like aluminum and copper.
Secure the parts using clamps or a vise. You don’t want anything moving while you’re applying heat.
Heating the Joint Evenly
Here’s where things get interesting—and where most people get tripped up.
You’ll need to heat the copper more than the aluminum. Why? Because copper pulls heat away fast, and aluminum melts quickly if overheated. If you treat both metals the same, the aluminum could melt before the filler even flows.
Start by aiming your torch at the copper side of the joint. Let it soak in some heat. Then slowly move to the aluminum, keeping the flame back a little. Keep the torch moving in a gentle circular motion. You don’t want to linger too long in one spot.
Watch the flux. Once it changes color or becomes clear, that’s your cue to apply the brazing rod.
Applying the Brazing Rod
Now the fun part. With the metal hot and the flux doing its job, touch the brazing rod to the joint. If everything is right, the filler will melt and wick into the seam on its own.
Don’t melt the rod with the torch. Let the hot metal do the work. This gives you a stronger joint and avoids overheating the base materials.
Move slowly along the joint, feeding the rod as you go. Let the filler flow all around the connection. Once you’re done, remove the heat and let it cool naturally.
Letting It Cool and Inspecting the Joint
Once you finish brazing, resist the urge to touch the metal. Let it air cool. Quenching it in water can cause stress cracks or weaken the joint.
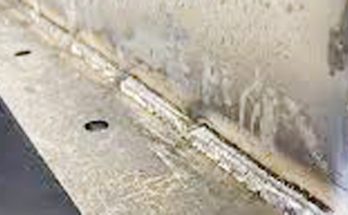
After it cools, inspect the connection. You’re looking for a smooth, even bead of filler metal that wraps around the joint. There shouldn’t be any gaps, voids, or cracks.
You can give the area a light brushing to remove any remaining flux residue. Some people use warm water and a wire brush, especially if the flux is corrosive.
Common Mistakes to Avoid
I’ve made these mistakes myself, so here’s what you should watch out for:
- Overheating the aluminum: It melts fast and gives you no warning. Always heat the copper first.
- Using the wrong flux: Regular brazing flux won’t work on aluminum. Make sure yours is labeled for aluminum.
- Poor surface prep: If the metals aren’t clean, the filler won’t flow. Take the time to scrub both pieces.
- Trying to braze too wide of a gap: The filler won’t bridge large spaces. Aim for a close fit between parts.
Where This Technique Is Useful
Brazing aluminum to copper is especially useful in:
- HVAC and refrigeration systems where aluminum pipes are common
- DIY auto projects like custom air intakes or intercooler piping
- Home plumbing repairs where adapters need to join dissimilar pipes
- Prototype building where fast, strong joints are needed without high-end tools
It’s not ideal for structural welding or critical load-bearing joints, but for electrical connections, plumbing, and light-duty repairs, it works great.
Differences Between Aluminum and Copper When Brazing
| Property | Aluminum | Copper |
|---|---|---|
| Melting point | ~1220°F (660°C) | ~1984°F (1085°C) |
| Heat conductivity | High | Very high |
| Oxidation behavior | Forms oxide instantly | Slower oxidation |
| Color when hot | Doesn’t change visibly | Darkens with heat |
| Brazing flux required | Yes (aluminum-specific) | Optional but helpful |
This table gives you a quick reference so you can understand how to handle both metals during the process.
Conclusion
Brazing aluminum to copper might sound intimidating at first, but once you understand the process, it becomes a lot more manageable. It’s all about preparation, patience, and the right tools.
Take the time to clean the metals, use the right flux, and control the heat. If you do those things, the filler will flow smoothly and create a solid, lasting joint.
I’ve used this technique in my garage many times, and each time I do, I’m reminded how powerful simple knowledge can be. It saves money, opens new DIY possibilities, and gives you more control over your projects.
FAQs
Can I braze aluminum to copper with a regular propane torch?
Yes, you can. Just make sure it gets hot enough. MAPP gas works even better if your torch supports it.
Do I need to use flux when brazing aluminum to copper?
Absolutely. Aluminum forms an oxide layer very quickly. The flux prevents this and helps the filler flow properly.
What’s the best filler rod for brazing aluminum to copper?
Look for a rod specifically labeled for aluminum-to-copper or aluminum-to-dissimilar metals. These are made with the right melting point and bonding properties.
Is it better to weld or braze aluminum to copper?
Brazing is generally better for aluminum-to-copper because welding these two dissimilar metals is much harder and often requires advanced equipment.
How strong is a brazed joint between aluminum and copper?
For most non-structural applications, it’s plenty strong. It holds up well in plumbing, HVAC, and light-duty mechanical use.
Can I braze aluminum to copper without flux?
No, not successfully. Flux is essential for breaking down aluminum oxides and allowing the filler to stick.
Is brazing aluminum to copper safe for home DIY projects?
Yes, if you follow safety precautions like wearing gloves, goggles, and working in a ventilated space. It’s a practical and safe process for most DIYers.